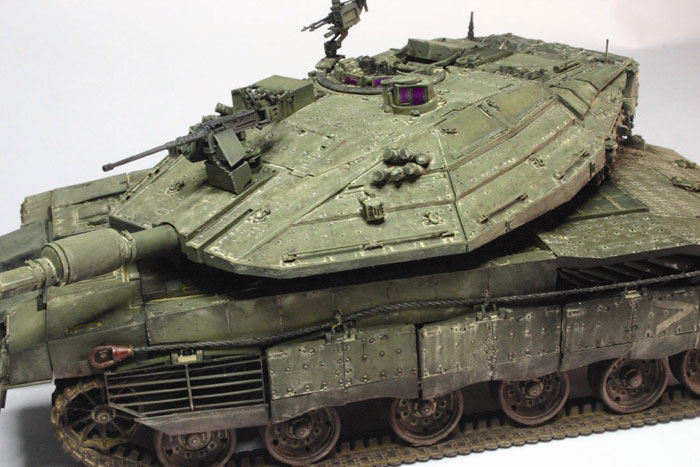
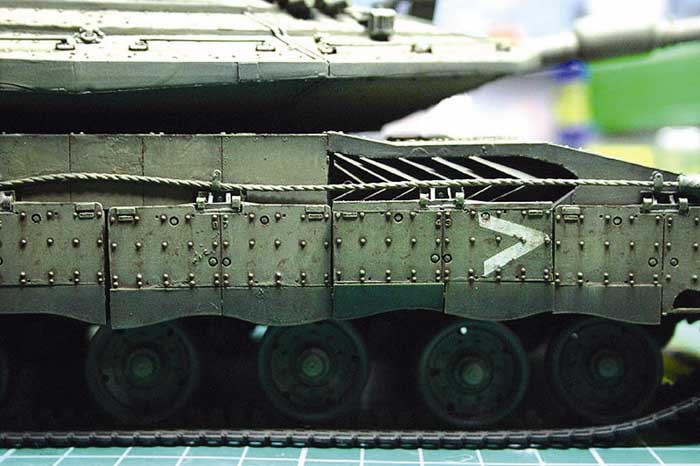
Painting and 1st Stage Weathering 1.The model was first given a coat of Creos Resin Primer. Then the complete model was totally covered with 2 bottles of Creos Flat Black to form the base for shadows and pre-shading. During the phase, I noticed the ball chains tend to flap all over the place and some parts will not get an even amount of paint. I stiffened the chains again by first arranging them properly and then by capillary action of the thin CA glue, but this time with a very fine tip applicator that I got from a hobby shop in town specializing in Gundam model kits. This helped in the painting greatly. 2. The model was then given a olive drab mottle dusting the whole area with an opacity of about 20%, something that I picked up from famed model maker Bernard Cher whose close associate has won several gold and silver medals at Euromilitaire and recent months, the best of show winner in Spain, Calvin Tan. Both are fond advocates of this technique. The OD was then solidly sprayed from the centre of the panel and worked toward the edges and panel lines, leaving it just short of covering it. This gives good and very even toning throughout the whole model as compared to the popular pre-shading once used by me and many modelers; by painting only the edges and lines with black to save paint. 3. The whole model was highlighted with a mixture of green that I concocted with Creos greens, buff, sand and tan colours. I paid more attention to the horizontal planes, giving them more highlight than the vertical ones so that we get closer to the real thing. But this also gives us a greater vertical depth when the model is view from a low high angle oblique, which is almost the case. As more paint on the horizontal areas are scotched by the sun than vertical ones, this also gives the model a better scaled down replicated look of the real thing. The shade of this green, in my opinion, is up to the individual. In the real tank, when new, is painted with a very dark Khaki Drab paint. In a couple of weeks under the sun and the desert harsh environment, it can turn almost khaki in noon day view! I have seen different tanks painted with the same colour of paint but from different suppliers turning into anything from grey, green to even pink! Photos are deceptive; a good visit to Israel can do wonders to our understanding of painting and weathering IDF and Arab tanks. Having trained alongside some is helpful too, as in my case. The Israeli colour has been a hot topic in the forums and many have claimed to be experts. As an armour designer and manufacturer by profession, I find it quite intriguing and sometimes amusing to note some of the quite “serious” arguments. The chemical composition of pigments to get the same colour can differ from manufacturer to manufacturer, the supplier to the army, likewise, depended on tender periods, can and will change from time to time. So, with polluted rain, sand, dry air, cold weather, all of which are at extremes but a normal occurrence in the middle east, it will be interesting to award each expert a “recognition for a day” award as most points of contention has its own limited merits. As far as I am concerned, I want the model to look appealing and leave the fight to the arm chair warriors in the forums. There is no point for me to get a 100% accurate model (if there ever can be one) looking like a piece of coal. I rather have people loving it as a work of art with an “inaccurate” colour anytime. Many have adopted improved version over Verlinden’s methods of making the model, but I still like the models he made in his first publication some 20 years ago! Art forms and school orientations move from time to time, but no one can say one thing is right or wrong based on their emphasis. Realism yes, style wise is questionable to me. Enough gripe, now back to the model. 4. Once done, the whole model was sprayed over with Creos Gloss and decals are applied at this time. Decals are taken from the scrap boxes of past IDF projects plus the Tamiya various tank decal sheet from the local hobby shop. The decals are set in place with Mr. Hobby Setting Solution and allowed to sit for 30 minutes before these are melted with Mr. Hobby decal softener and pressed into the details with the aid of Q tips. Once the decals are set overnight, the model was over sprayed with two coats of Mr. Creos Flat to protect it from the harsh treatments of filters and pin washes 5. The model is them unified by a series of filters I made with artist turps from Rowney and Tamiya enamel paints. I used enamel paints over the popular oil, although higher in costs, is because it has finer pigments and sticky carriers that allow the pigments to sit properly around the details. The problem with oils is that we have to use it with a hair dryer on one hand. Leaving it to dry on its own will only allow “halos” for form around the details and not at the details which we want! I filtered the model with sandy brown, when this is dried, a coat of tan and subsequently with a light coat of panzer grey. While the last treatment is wet, I pin washed the rivets and details with raw umber. This prevents the “halos” effect as the surface energy for adhesion is increased (in composite speak), as well as it saves time. With the three steps completed, the model looked more homogenous in picture 11.
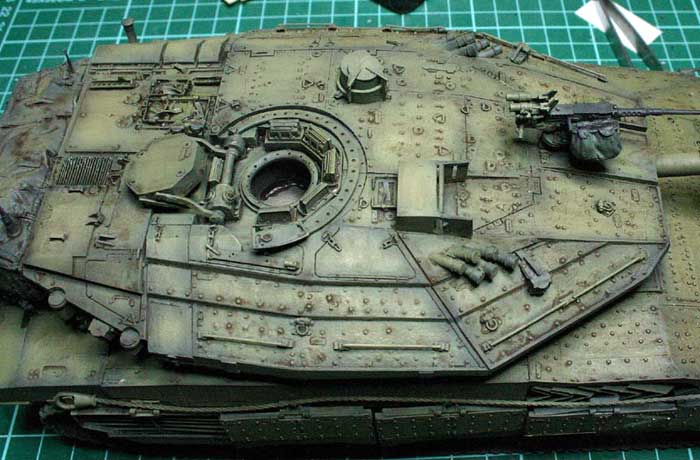
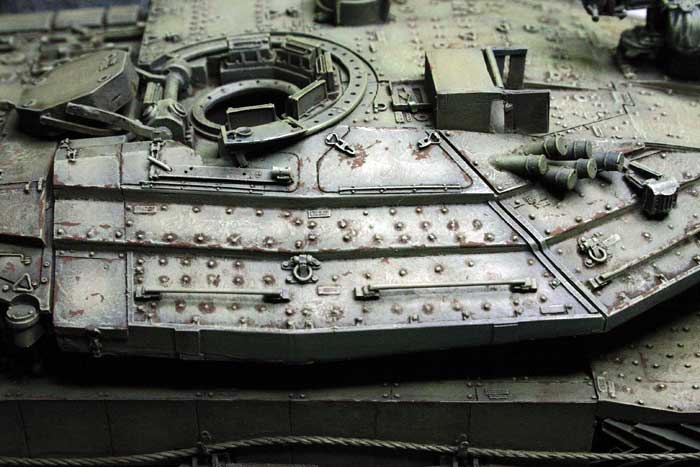
6. The details are then highlighted with sand by dry brushing; a technique that has become passé with many modelers, but still is a good one. It serves its purposes here well. 7. Details which are commonly threaded upon were given a good burnishing dry brush of raw umber oil paints. 8. Then the whole model was subjected to 2 colours chipping exercise. Things corrode easily in Israel, the extreme heat promotes oxidation. I use Vallejo paints of German uniform green, dark leather for the darker shades. This paint is thinned with 70% water to 30% paint and then texturized with black pastel powder from M Workshop. This will give a very dark and roughened surface looking like rust. This has to be diluted every few minutes and the brush has to be extremely high quality 00 saber. This is bit mapped in dots over the usual busy areas. Larger spots are an agglomerate of the small bitmaps and not painted on. This is so to achieve a very uneven and dry spot. 8. The rusted areas are then highlighted with the second shade mentioned. This is a blend of signal orange, yellow, khaki and German uniform green as well the M Workshop black pastels. I have tried using the Mig pigments, but have some problems with it as I can’t get it to blend with water and PVA or EAA solutions well. Using it with turpentine needed a lot of experimentation as the medium is hard to visualize and control. Once mastered, I am sure some can produce spectacular results. But it just couldn’t cut it for me, I wish I knew why, perhaps its artistic incline or some would say the lack of it in me is the main reason. Pic 12 shows the dry brushed, burnished and chipped turret that is ready for detailing. Pic 13 shows the two tone chipping.
Pic 12 First tone chipping
Pic 13 Two tone chipping
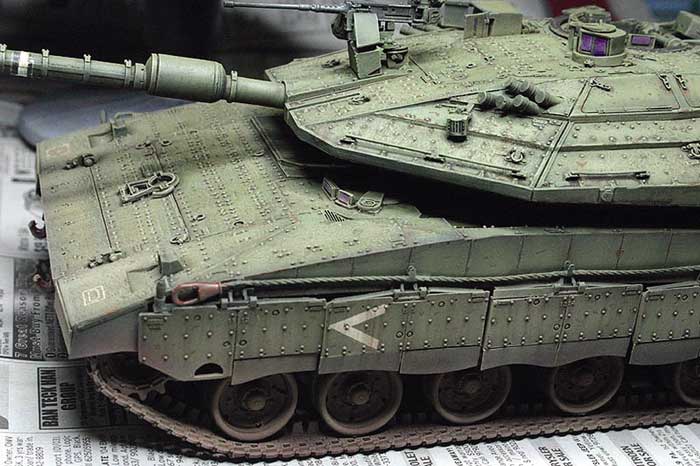
9. At this point, the MAG ring round the turret cupola is painted black, dry brushed with gun blue, chipped and brushed with oily steel all from Vallejo. It can be seen in Pic 13 10. Rain marks and rust marks are introduced at this point. The rain marks are introduced using very diluted Tamiya Acrylic buff with 90% water and streaked with a number 2 brush. This is repeated very lightly over a few times covering little areas at a time. Careful not to over do it, it is a tank, if overdone, it can turn into another beast, a tiger or a zebra may be the resulting disaster; entailing a naming or cursing exercise to your own liking! What we want is only a suggestion of weathering and not painting it! Rain streaks are very prominent in the middle east due to the amount of suspended sediments in the atmosphere there. Rust streaks are done with burnt umber and burnt sienna oil colours. These are point pricked on the surface with a 0 brush then “pulled” down with a No. 2 brush damp with Rowney Turps.
Pic 14 Streaking, rain marks and rust noting that in a modern tank, not everything rusts.
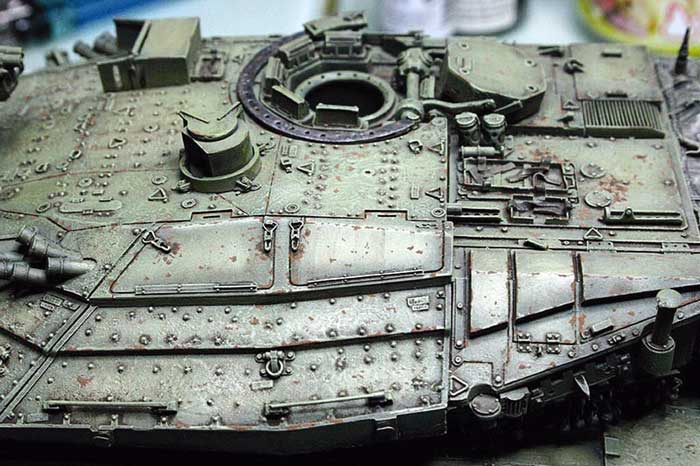
Detailing Prior to further weathering, details are added to the tank. Cable ends are painted red, the stowage tray straps were added. These were fashioned from lead foil and pressed into service. These are painted Vallejo dark leather and when cured dry brushed with tan and sand mixture of 50:50. Then a light glaze of black using a 80:20 very diluted Vallejo black to tone the shadows of the straps.
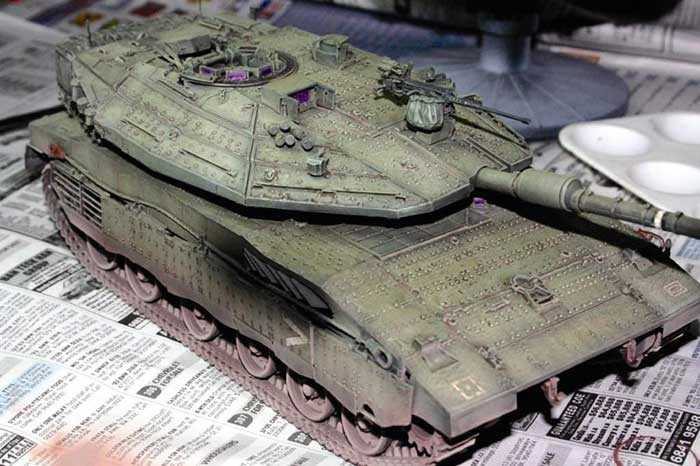
Dusting and Pastels – 2nd stage weathering 1. The model was spray from the bottom with Flat Brown from Tamiya Acrylics. This is only thinned with 5% ethanol to give it a gooey and rough look. I concentrate it around the wheels and track area.
Pic 15 Flat brown or dark earth coated wheels, tracks and some over spray in the lower regions
2. The model is over sprayed with a dust cover of Tamiya Acrylic Buff very slightly. Throwing action with the airbrush from ground up from the front obliquely to the rear at the two sides of the tank is done on short and quick strokes. The soot is similarly done to the exhaust areas.
Pic 16 Model is buffed, notice the purple scopes with some appearing pink?
3. The wheels and tracks are then burnished with oily silver, black and raw umber oil paints.
Pic 17, notice the burnished wheels? 4. The model is then pin washed with pigments of sand, white and earth. These are mixed into very thin solution. It is done little at a time to small areas rather better than trying to get the whole model at one go. It is highly irreversible. Too little is better that excess as more can be incrementally added and the reverse is not true in this case. The damage is permanent once the vehicle or medium cures. The vehicle or medium in this case is water and PVA glue. The consistency of mix is about that of milk. The areas to be treated are wet using wet water! Wet water is soft water, distilled water with a few drops of detergent per litre to break surface tension of acrylic and lacquer based surfaces. Next, the dust solution is pin washed into the details allowing it to run on its own capillary force. It may appear invisible initially, once hair dryer dried, the effect becomes apparent and can then be assessed if any more is needed. Patience here will pay back in heaps. The whole model is done a square inch at a time with earth. When the process is completed, patches are randomly covered again with sandy colour pigments using the same process and much later, a little bit of titanium white. White is the most dangerous. Getting it right sings, getting it wrong, it screams with the model looking like a spurned leopard! So go extra mile on it as far as patience goes and do it very subtly and slowly. Once done, pigments are treated to the tracks like you would see in many Spanish school models. A good technique reference to have is the FAQ by Mig Jimenez. 5. The final touch up is done using Schminke Pastel pigments. These are brushed on little bit at a time. The beauty of these pastel is that it they are highly resilient to touch and sticks to the surface unlike many in the market. Once done, the whole model is set aside to dry for 4 days before it was packed and shipped. I hope this workshop article will prove an interesting read for many young model makers out there picking up the hobby, a strong welcome to the house of the dedicated; for some, like myself, bordering fanatic. I hope the gallery of the pictures of the completed model published will encourage everyone out there reading this great magazine to attempt on subjects like these. Do not let the impending demands of building a difficult model curb you from attempting, with time and patience, and a little practice, the end result can be very rewarding.
Home
Model and Text by Norman
Lim |
||||||||