|
|
|
|
Pz.Kpfw. 38(t) Ausf. E/F
by Cookie Sewell
Summary
| Stock Number and Description | Tristar 1/35 Scale Model Kit No. 020; German Pz.Kpfw. 38(t) Ausf. E/F |
| Scale: | 1/35 |
| Media and Contents: | 530 parts (482 parts in tan styrene, 40 etched brass, 8 clear styrene) |
| Price: | US $42.00 |
| Review Type: | FirstLook and FirstBuild |
| Advantages: | Nice, crisp new kit of old favorite; if you have to use putty on this kit, then YOU made a mistake! |
| Disadvantages: | tracks are not particularly fun to assemble (see text) |
| Recommendation: | Highly Recommended for all early war German and "Small Army" fans |
Background
(NOTE: Review sample is a "Beta" kit
with no etched parts, no figure, and no decals)
Imagine the surprise the German army felt when they "merged" with
Czechoslovakia in 1939 and found that the Czechs had a better tank
industry than they did, and better light tanks!
The Czech Army was equipped with
two well-thought-out light tanks, the LT vz 35 (S-II) and the LT vz
38 (TNHP-S). Both were products of the famous Skoda factory and were
superior to their German equivalents of the time, the Pzkw. I and
Pzkw. II. As a point of fact, both were as powerful as the German
Pzkw. III variants of the time but weighed less.
Needless to say, the Germans knew a good thing when they saw it and
took both of them into service as the Pzkw. 35(t) and the Pzkw.
38(t). The latter had such a reliable and flexible chassis that it
also served to provide the Germans with a large number of
self-propelled guns, the most well known being the Marder III and
Hetzer self-propelled antitank guns.
Over 1,300 Pzkw. 38(t) tanks in seven production series served in
the Wehrmacht and fought in Poland, France and Russia. The largest
group were the Ausf. E and similar Ausf. F, with over 525 being
built for the Germans by Skoda. The tanks were armed with a good
37mm gun and two Czech 7.92mm machine guns, possessed 30mm armor
protection (two layers of 15mm plate) and 50mm glacis protection
(two layers of 25mm plate). It could do more than 40 kph and had a
range of 230 km with a full fueling.
While the small the tanks gave a good account of themselves until
they ran up against the Soviet T-34 and KV tanks, and as attrition
(and conversion to SP guns) took its toll they slowly left the
German inventory.
The TNHP-S has always been one of the more popular "small army" tank
designs, and a bit over 30 years ago Italeri (back when it was still
Italieri) came out with a nice kit of what was reportedly an Ausf.
G. It was a very nice kit for the time, but over the years it was
found to contain a lot of flaws or (no driver's hatch!) areas that
Italeri had overlooked (wheels with no backs to them.) It could be
made into a nice model, but it took a lot of work and a lot of
after-market bits to make it so.
There is evidence that one of the Eastern European companies came
out with a kit – Alan I think – but it was given very short shrift
and rarely shows up in commentary.
FirstLook
Now Tristar has released a brand
new kit, and just before the Memorial Day Weekend in the US I
received a "Beta" version of the kit – complete less decals, etched
brass and the figure. Having nothing else to do (I am awaiting
materials for two projects which are on order) and having seen the
sneers of the "experten" on the Internet that one has to build
models to review them, in spite of any other relevant skills or
experience, I put this one together to see what it was like.
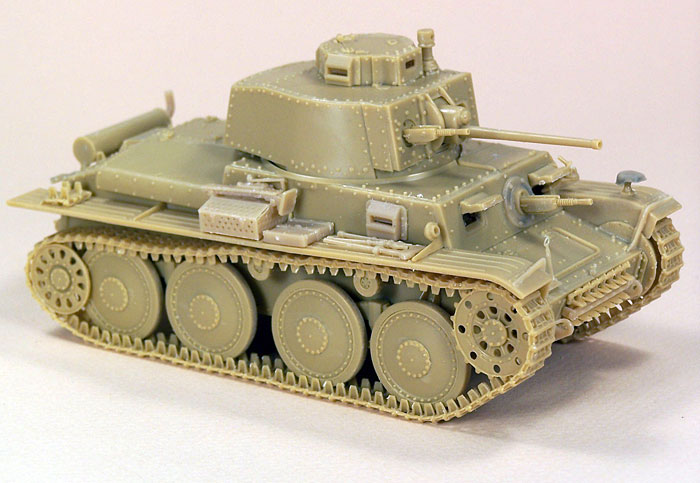
The model has at least twice as many parts as the old Italeri kit,
and even thought it uses a similar parts breakdown that is about all
the kits have in common. Nearly everything I recall as having been
left off the Italeri kit is now present, and to top it off, the kit
provides very clean single link tracks. It took me only 10 hours
flat to assemble the kit, and that includes the tracks; this speaks
volumes about them, for many other kits require at least that amount
of time in cleaning them up, fitting them, assembling them and then
attaching them to the model.
Assembly
This is a very precisely engineered
kit, and as noted above if parts don't fit then it is YOUR fault and
not Tristar's! I had some fit problems which soon turned out to be
"operator error" on my part and not theirs.
Assembly starts with the wheels, which are very delicate and require
a great deal of care in assembly. Tires for the road wheels and
return rollers are separate parts, nice if you want to paint them
before installation, and since the last step is installing the
tracks you may prefer that. Like nearly all "flat kits" (belly,
sides, and rear plate as separate parts) the hull is next, and you
will have to take care to find the detail parts on the very compact
and busy sprues.
In Step 4 you begin using the clear parts; note that part G-3 is
mounted as far to the right in the glacis opening as possible in
order to clear handle C-19 if the visor C-18 is left in the open
position. There are two visors for the right side, G-1 and G-2, but
I have no idea what the difference is and simply used the G-2 one.
Mounting the bow machine gun is tricky as the handles are difficult
to get through the opening in the glacis and take some finesse. They
are parallel to the ground whereas the shots I have of the Czech
machine guns show them slanted downward like "cadillacs" but I have
no idea if this is correct or now.
Step 5 – tools and stowage – would have been easier with the etched
brass straps! I cannot comment on the etched as it did not come with
the kit.
Step 6 covers the upper hull and again note that all parts are a
snug – but correct – fit. I suggest mount the rear deck frame (A-4)
first as it has to have its rear edge butted against the rear plate
and not on top of it. The driver's hatch is nicely done – padding is
molded on the inside and no ejection pin marks. (There are some on
the inside of the hull and under the fenders, but none in any place
of importance.)
What I think is the smoke candle box in Step 7D is somewhat tricky
for the slotted section (part D-45) is the only one that did not
seem to self-align. Once assembled the box fits well on the stern
plate. The only problem I found in the entire kit worth mentioned
took place here. The kit offers you the adjustment splines for the
track tensioning devices (parts E-33) or covers for them (E-34) but
suggests that the covers go over the splines. That flat out will not
work, as the covers are supposed to fit flush and if assembled per
kit instructions there is a good 2 mm of daylight under them. I left
the covers off, but I think the right choice would be to install the
covers and skip the splines.
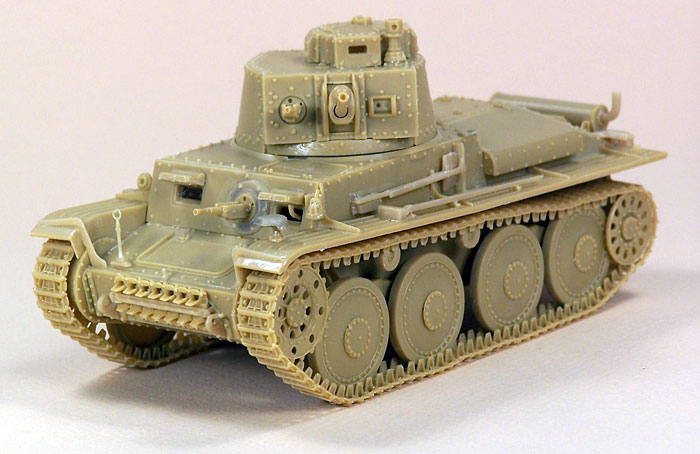
Step 8 is the initial turret assembly and it requires care. If you
do it right, the gunner's telescopic sight (B-26) rotates with the
gun and this is visible from the front of the turret. Step 8-3
covers the commander's cupola and if you take your time and care the
entire assembly literally goes together without any seams that
should not be there.
In Step 8-4 – turret body – I cemented one side in place, then the
back, then the other side, and finally the roof and front skirt.
This way I was able to align all the parts and again, no gaps. The
turret front is a dead-on fit and the side plates (C-14 and 15) also
snug up without seams.
Step 9 is the track installation; I did one their way and one my
way. Their way is simply snapping the links together and installing
them, but most of the pins are too weak to hold so it was more than
a bit frustrating. I did make a small jig for assembly out of a
section of 0.080" square (2mm) strip glued to a section of 0.040"
sheet (1mm) to assist in alignment. "My way" was to use Tamiya
"Orange" cement and make sections of ten with the pins filled off
the end sections, and then assemble them on the model. It was faster
and a LOT less frustrating!
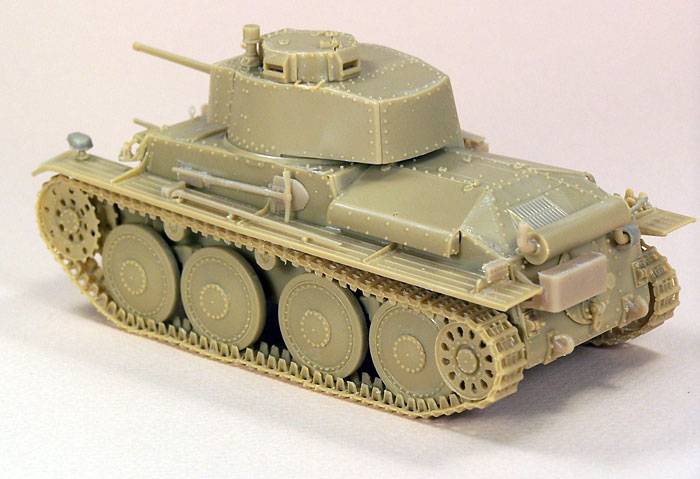
Conclusion
In summary, while I cannot comment on the quality of the etched brass and the figure, or the decals (the directions show six different finishing options from 1941-1942) the kit is one of the neatest assembly jobs that I have found in some time, rivaling some kits with fewer parts.
The tracks are fussy but nothing you can't survive, and only take about an hour to clean up – that's over 200 links which only need a couple of quick passes with a sanding stick over the hinges if you use a sprue nipper.
A fun build – and quick!
Highly Recommended.
Thanks to Bob Lewen of MRC for the "Beta" kit!
Home
![]() Discussion Groups
Discussion Groups
![]() Gallery
Gallery
![]() Articles
Articles
![]() Reviews
Reviews
Copyright
![]() Vendors Room
Vendors Room
![]() Links
Links
![]() Contact us
Contact us
Copyright www.missing-lynx.com 2006