| |
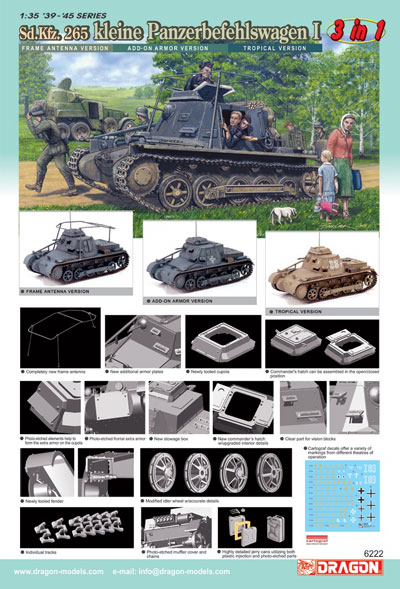
Dragon Sd.Kfz.265 kleine Panzerbefehlswagen
I “3-in-1” (6222)
by Frank De Sisto
Contains 460 styrene plastic parts including 24 clear and 216 individual
link tracks, three photo-etched brass frets, eight pages of instructions
with the assembly steps varying according to the version chosen by the
modeler, and three sets of markings. Price: unavailable.
DML continues to get a great deal of mileage from their latest kits,
often by releasing major variations. Or, as in the case of this latest
release, minor variations of a vehicle which itself is a major variation
of the base vehicle. Thus we have a kit that will allow the modeler to
make nearly any variation of the kleine Panzerbefehlswagen I, including
the three that are head-lined on the box-top and the instructions. These
are a “Frame Antenna Version”, an “Add-on Armor Version”
and a “Tropical Version”.
Aside from these features, DML’s designers have tackled the main
visual inaccuracy of the original issues of this kit (two different Pz.Kpfw.
I Ausf.Bs and the first kl.Bef.Pz. I), namely, the rear idler wheel. The
original kits not only depicted this (slotted or “skeleton”)
wheel as solid, but also instructed the modeler to paint the rim as if
it was rubber-tired. Sorry; wrong! But all is not lost, since DML has
recently been observed to take many of the criticisms leveled at their
kits “to heart”, and have gone ahead and made many corrections
to them. Luckily for us modelers, this kit is no different. So, there
are new parts, as well as modified parts, to depict two different variations
of the idler wheel, both properly configured, according to Jentz and Doyle’s
Panzer Tracts #1-2. Note that I said two different variations, not two
complete sets of idler wheels. So don’t get excited (as I did before
I inspected this kit) by thinking you can take the extras from this kit
and add it to a previously acquired kit; you can’t.
There are several other major changes to the original parts. The hull
pan (part “I”) has been modified to accept a photo-etched
brass fender edge (other photo-etch parts provide for screening to go
under the engine deck grill, a perforated shield for the exhaust muffler
and chains for the smoke-candle rack) for scale appearance. It has also
been modified by thinning the front and rear edges, so the modeler can
now choose to leave off the front and/or rear mud flaps, and still things
will look realistically thin. There is a second rain guard (part K24)
for the commander’s cupola with a slight variation in the rear face.
There are completely new visors in clear styrene for the entire vehicle.
These all include internal latch and mount details and can all be modeled
in the opened or closed position.
Other new parts include the frame antenna and mounts, as well as the
storage bin often seen behind the superstructure. This includes a separate
lid that can be modeled opened or closed. There are also new engine deck
access hatches with the cut-outs and cowlings, to represent a “Tropen”
(Tropical) version. The up-armored version receives new styrene panels
for the front of the superstructure, the visor seen on that face, and
the plate that was fitted to the rear half of the glacis plate. The bow
appliqué armor is represented by an etched brass plate, to which
bolts (provided on sprue “K”) are added. Six jerry cans (as
seen for instance, in the recent Tiger I kit) are also included. These
have etched brass parts that get sandwiched in-between the cans’
halves, representing weld beads. Items seen in the original kit, but absent
here, are the figures and the option to model the very early version without
the commander’s cupola.
The kit also has a number of other options, such as several different
tail lamp configurations. Note that one of these is part of the “Notek”
blackout driving system. The Notek head-lamp, not part of the original
kit, is included here, along with its mount (parts E9 and E10). If using
this option, note that it was not seen on German AFVs used in the Polish,
French or Norwegian campaigns (see my comments below regarding the instructions
and the colors and markings). Other options include a smoke-candle rack
with its attendant hull rear plate, clear or solid plastic head lamp lenses
and variations on the device to reinforce the idler wheel mounts. There
are also separate view ports, signal pistol ports, crew hatches, engine
access hatches, and finally, fuel and water filler port hatches. Although
not specifically mentioned in the instructions for the original kit, this
new kit shows the option to delete the separate armor plate that was bolted
to the hull superstructure sides just above the fenders, as was done on
some vehicles.
As there has been much commenting regarding the decision by DMLs designers
to use separate outer panels on the hull and superstructure, I carefully
test fitted and attached these parts. As long as they are carefully cleaned
and placed (I put the two side plates on first, followed by the front,
rear, and finally, the roof) only a tiny bit of filler will be needed.
This minute gap appeared on the port side of the roof plate. I also do
not feel (as some do) that the weld seams are overstated.
Overall, the parts break-down allows for maximum detail. For instance,
the front mud flaps are cleverly designed so that the small rivets seen
on each side, as well as the tops of the parts are all there. This is
done without resorting to slide-mold technology. The vehicle’s small
fittings, tools, and especially the jack, antenna base and self-defense
MG34, are also very nicely depicted. There are no visible ejector pin
marks on any outside surface of the kit. In another improvement compared
to the original kit, all ejector pin marks on the insides of the hatch
lids (which were fairly light to begin with) are absent from this kit.
The suspension is broken down so that maximum detail is present and the
main units can articulate. However, this is also where the kit’s
only remaining, and rather minor inaccuracy occurs. The bulges that protected
the final drive housings, on the lower front plate of the bow, should
be flat at the bottom, which would also slightly alter their shape. I
suspect that re-working them would have meant completely re-tooling the
hull pan as well. Regardless, with a judicious application of mud, this
will be barely noticeable.
The 216 individual link tracks will be a chore to clean and assemble
since there are five sprue attachment points per link. However, there
are no ejector pin marks on these tiny fellows, because the designers
put them next to the parts, thus the five attachment points per link.
The obvious trade-off is either having a difficult-to-clean ejector pin
mark on the part, or more easily cleaned attachment points. I believe
the designers made the better choice. The fitting of the tracks to the
suspension will be aided because the designer’s had the good sense
to leave the idler wheel axles as separate, adjustable parts. I strongly
recommend that the modeler take advantage of this by not cementing the
idler wheel axles into position until after the tracks are fitted. Personally,
I will hang Friulmodel tracks on my kit.
The instructions are clearly drawn and can be followed with confidence,
with the exceptions noted below. The three sets of markings are beautifully
printed by Cartograf of Italy, but there are several things to note.
1. Frame Antenna Version: This depicts a vehicle that should have a Notek
lamp, and no armor plate bolted to the superstructure sides, as shown
in the instructions. Contrary to the instructions, this should also have
the storage box behind the superstructure. Photos suggest that it should
also have the new cupola rain guard (part K24). I also believe that at
the time of its use (either the Balkans or early in Barbarossa) it should
have been fitted with the appliqué armor plates. It should be finished
in overall dunkelgrau RAL 7021.
2. The Add-on Armor Version is marked as belonging to the 11. Panzer
Division, and served in Operation Barbarossa. The instructions correctly
leave off the bolted armor plates on either side of the superstructure.
It should have the Notek lamp fitted, and no storage box behind the superstructure,
contrary to the instructions. It should be finished in overall dunkelgrau
RAL 7021).
3. The “Tropical Version”, seen in North Africa should be
in a two-tone scheme of gelbbraun RAL 8000 and graugruen RAL 7008 (over
the base dunkelgrau RAL 7021). Contrary to the instructions, it has the
appliqué armor panels and front Notek lamp, but is missing the
bolted plates on either side of the superstructure. The photo I based
this commentary upon also shows an empty rack, probably for jerry cans,
on the left side rear fender. This is not included in the kit.
The information above is taken from various publications such as: Panzer
Tracts 1-2, by Tom Jentz and Hilary Doyle, “Objectif Moscou”,
by Yves Buffetaut, “Achtung Panzer: The Invasion of France and the
Low Countries” by John Feenstra, and DMLs 2005 catalog.
In conclusion, this kit is a vast improvement over what was a very sound
kit to begin with. The refinements, as well as the options, make this
the kit of choice for modelers of this early war Panzer.
Highly recommended.
Reviewer’s note: Since May of 2005, I have been working on books
for Concord Publications, a sister company to DML. The reader may wish
to take this into consideration. For my part, I will attempt to maintain
an objective viewpoint when writing these reviews.
DML kits are available from retail and mail order shops. For details
see their web site at: www.dragonmodelsltd.com.
|
|