|
|
|
|
| Home > Reviews > Britain > AFV Club 1/35 Scale Churchill Mk. III British Infantry Tank; Churchill British Infantry Tank Track (Workable) |
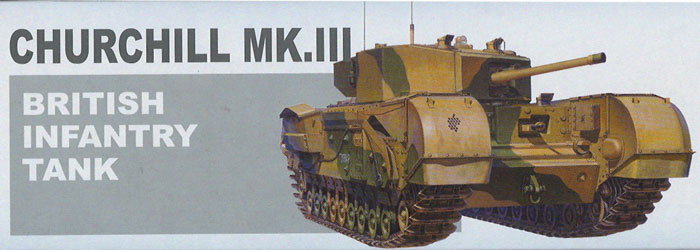
Churchill Mk. III British Infantry Tank
Churchill British Infantry Tank Track (Workable)
Reviewed by Cookie Sewell
Summary
| Stock Number; Description and Price | AFV Club Churchill Series 1/35 scale Kit No. AF35153, Churchill Mk. III British Infantry Tank; estimated price about US$48 1/35 scale Kit No. AF35156, Churchill British Infantry Tank Track (Workable); 320 parts in dark brown plastic; estimated price about US$16 |
| Scale: | 1/35 |
| Media and Contents: | 465 parts (392 in olive drab styrene, 29 etched brass, 22 metal springs, 14 clear styrene, 6 black vinyl, 1 turned aluminum barrel, 1 length of black nylon string) |
| Review Type: | First Look |
| Advantages: | First new kit of this vehicle in 30 years; very comprehensive breakdown of parts offers many options and a forecast of other variants to follow |
| Disadvantages: | very complex suspension will try modelers’ patience and dexterity |
| Recommendation: | Recommended for all Commonwealth and even Soviet armo(u)r fans |

FirstLook
Considering that the British were the ones to invent the tank in 1916 and essentially became the leading developers in World War I, it was unfortunate that their tank industry basically fell into the doldrums during the 1920s and 1930s. As a result, they stuck to what turned out to be failed concepts long after other countries abandoned them.
By 1941 most of the other nations – Germany, the Soviet Union, and the US - had gone to three basic tank types: light, medium and heavy, with only the US not fielding a heavy tank in combat during the course of the war. But the British stuck to three other types: light, infantry, and cruiser. Infantry tanks were slow but heavily armed and were designed to support infantry; cruiser tanks were fast, armed with what appeared to be powerful antitank guns, and were designed to combat other tanks. While those concepts quickly wilted in the fact of the German Wehrmacht, the British kept on and it was only due to the adoption of the US M3 and M4 series medium tanks they enjoyed a functional medium class tank.
The Churchill or A22 Infantry Tank Mark IV was one of the throwback designs. A big, heavy and slow tank – it weighed between 43 and 45 short tons depending on model and on a good day and level road could hit 15 mph – did have heavy armor protection but did not mount a all-around useful gun until 1943 when it was fitted with a 75mm gun. It was underpowered with a 350 HP “Twin Six” Bedford engine that could only cover 90 miles on highway. Relatively roomy and comfortable inside, it had a number of throwback designs such as the “wraparound” tracks which, while supplied in the Mark III and later variants with fenders and mud guards, were more often than not seen with missing sections making entry and exit – and “tankoviy desant” troops for the Soviets – virtually impossible when moving. While a number were supplied to the Soviets via Lend-Lease, they did not like it as it was a heavy tank (only 6-8 tons lighter than a KV-1) with too small a gun (57mm 6-pdr) for Russian tastes. While they used them as heavy tanks, they considered them nothing of the sort.
Over 5,600 were built during the course of the war. Its chief advantage was that while not suited to fast armored engagements it was a useful platform for conversion, and the 79th Armoured Division took numerous modifications and variants of the Churchill into Europe to include the AVRE, AVRE with Small Box Girder Bridge, and the Crocodile flamethrower.
All that being said, the Churchill has always enjoyed popularity with modelers as it is a big, ugly tank with lots of bits and items which attract the eye. But until now other than resin kits only two kits have been made – both using the Mark VII chassis which is quite different from the earlier variants, and both essentially being the same model. The first one was the Tamiya Churchill Crocodile with the flame mixture trailer and a later straight Mark VII (created by leaving out the trailer and adding a sprue of new figures) with different markings. These were good kits in their day, but while easy to build they had a lot of accuracy problems and also oversimplification of assemblies.
AFV Club has found a niche in the current “kit wars” and been the first to fill it, now presenting this lovely kit of a Mark III – which is a welded turret variant with fenders, mudguards, and a 6-pdr main gun. The kit comes with a plethora of working details such as a fully sprung suspension, etched brass and a turned aluminum gun barrel (happily this one no longer comes with the gimmicky spring for “recoil” action) and nicely detailed vinyl tracks.
But as they say, be careful what you wish for! The suspension is among the most complex I have seen in some time, and from examining it and seeing comments from others on line it looks to be a handful. Each of the 12 bogie units on each side consists of a central tower, metal spring, rocker arm, four-piece bogie carrier units, bogie separators/dividers, and 12 twin wheel sets per side. The problems revolve trying to get all 12 of the bogie towers (which place the springs under compression in place in one sponson half and then cement the other side of the sponson to it to “capture” them without launching tower units into space (or worse, shag carpet). Each complete sponson requires 96 parts – more than many kits consisted of 30 years ago.
That being said, the only other real problem is that while every major hatch opens up ther are few if any provisions to install an interior. For example, the side hatches are neatly done and have inner and outer parts to provide for the correct thickness. But the actual vehicle (having photographed the one in the Cobbaton Combat Collection, which was a “runner” at the time and being serviced with hatches open) has a “tunnel” from the driver’s compartment to the hatch; here there are just the inner bits of the sponson assembly. A gun breech for the 6-pdr is included, but no other interior bits other than the inner sides of the hatches and the periscopes.
Regarding assembly, note that as other variants are planned (to cover all but Mark VII and later variants with the “round” hatches) assembly begins by drilling out openings in the sponsons to accommodate the heavy bolts used in assembly. Note that while assembly of the sponsons in Step 2 will leave a seam across the bottom of the sponsons, once the rocker arms (parts D21/D22) and the bogie carrier units are in place it is a moot point. In Step 4 take care when aligning the bogie separators (parts D17-20) as they have to fit straight and at the same time you have to “trap” the rocker arms between the two bogie carriers (D1-2, D15-16). As the tower units are left loose, and as they have to mate up with the rocker arms, it does make alignment in Steps 4 and 5 for installing the road wheels easier.
Once past that, for the most part the rest of the kit is simple to assemble. Note again that the etched brass parts are called out as normal parts (G parts) with no flags for using ACC glue. The Besa machine guns also have lovely little etched brass ventilated guards (G15) that have to be fitted.
In the steps from 19 and up, things get muddied up as the drawings used are fussy and a number of things are either optional or require preparatory work. Parts B12 and B13 are the inside fender walls for the front, and it would be easier to install them before the tracks. In Step 20, it shows two holes to be drilled out prior to installing the rear mud guards (parts A12, A14). But in Step 21 it shows that you only need to do that if you use the “Type 2" braces. Mesh fans will probably be happy that while the air intake covers are solid (Parts E12) if you use the covers (Parts E11) very little shows.
In Step 22 note that what the directions are trying to convey is to shave off the interior pints on parts A28-31, which are external braces.
Four different finishing options are given: “Kingforce”, El Alamein, October 1942 (sand and dark green; Soviet Army, Winter 1942 (whitewash over dark green, Guards Red 61 “Aleksandr Nevskiy”); 14th Canadian Armour (Calgary) Regiment, UK 1942 (dark green, “White 13" with blue trim and Canadian divisional flash); and 51st RTR, Tunisia February 1943 (dark green with “White 15" in a yellow ring). I have no idea how accurate the markings are, and in the past AFV Club has made some errors so cannot comment.
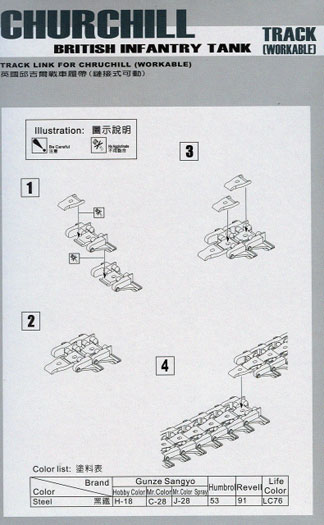 The complementary single link tracks are nicely done, and if the model is to be displayed with the fenders and mudguards removed or missing is probably the best way to go. These are of the later pattern track with open hinges and cleated bar. Each link consists of a base section and a tongue-shaped “keeper” which is cemented to it. Assembly requires trapping the bar at the back of the “keeper” of one link with the base and “keeper” of the next link, and leaving one link open when complete to fit the set to the model. There are two ejection pin marks on each link, but they are shallow and sit where a few passes with a sanding stick will eliminate them.
Note that nowhere on the box does it state how many links are needed but the documents I have list either 70 or 72, which leaves about 16 to 20 spares in the box for use as additional armor protection if desired (use photos for this).
The tracks are molded in a dark brown, which considering they tend to have a high manganese level is close to correct so use that as a basis for painting before weathering.
Overall this is a really nice kit and a big upgrade to the previous market of two identical variants. I personally am hoping for the AVRE which served into the 1960s!
Sprue Breakdown
Churchill Mk. III
A 37 Hull, mud guards
B 32 Upper hull, fenders, hatches
C 26 Sponsons, turret details
D 70 x 2 Suspension, wheels
E 73 x 2 Sponson details, machine guns
F 11 Welded turret
G 29 Etched brass
H 14 Clear styrene
J 1 Black nylon string
K 22 Metal springs
M 1 Turned aluminum barrel
T 6 Black vinyl
Churchill Track
– 40 x 8 Two-piece single link tracks
Thanks to Hobby Fan and Miin Herng Tsueng for the review samples.
Home
![]() Discussion Groups
Discussion Groups
![]() Gallery
Gallery
![]() Articles
Articles
![]() Reviews
Reviews
Copyright
![]() Vendors Room
Vendors Room
![]() Links
Links
![]() Contact us
Contact us
Copyright www.missing-lynx.com 2008
![]()
Text by
Cookie Sewell
Page Created 30 November, 2008
Page Last Updated
30 November, 2008