|
|
|
|
| Home > Reviews > Axis > Dragon Models Limited 1/35 scale ‘39-‘45 Series Kit No. 6712; IJNavy Type 2 (Ka-Mi) Amphibious Tank w/Floating Pontoon Late Production - Smart Kit |
IJNavy Type 2 (Ka-Mi) Amphibious Tank w/Floating Pontoon Late Production - Smart Kit
Reviewed by Cookie Sewell
Summary
| Stock Number and Description | Dragon Models Limited 1/35 scale ‘39-‘45 Series Kit No. 6712; IJNavy Type 2 (Ka-Mi) Amphibious Tank w/Floating Pontoon Late Production - Smart Kit |
| Scale: | 1/35 |
| Media and Contents: | 367 parts (320 in grey styrene, 31 etched brass, 13 clear styrene, 2 DS plastic track runs, 1 length of copper wire) |
| Price: | pre-order price US$62.95 via Dragon USA Online |
| Review Type: | First Look |
| Advantages: | Adds the flotation pontoon to the excellent kit; pre-molded open hatches makes installation of a full interior a snap; wise inclusion of DS Plastic track avoids frustration with itty-bitty single links; nearly identical to more expensive |
| Disadvantages: | Nothing major noted |
| Recommendation: | Highly Recommended for all Pacific War modelers and diorama fans |

FirstLook
As I noted when the first (non-amphibious) version of this kit was released, amphibious tanks per se are a contradiction in terms, for as the old farmer in the joke knows, “cast iron sinks” and so does steel. Items which were created to stop bullets, shell splinters and projectiles from penetrating them also did not need to be 100% watertight to do that job well.
During the 1930s only two nations gave serious thought to amphibious light tanks for scouting purposes: the USSR and Japan. The former did it as an analysis of the terrain of the country said they would encounter a water obstacle which could not easily be forded every 10 kilometers and a river every 50. The latter did it for, as an island nation, they knew they would need to move from island to island if they wanted to defend their empire or expand it.
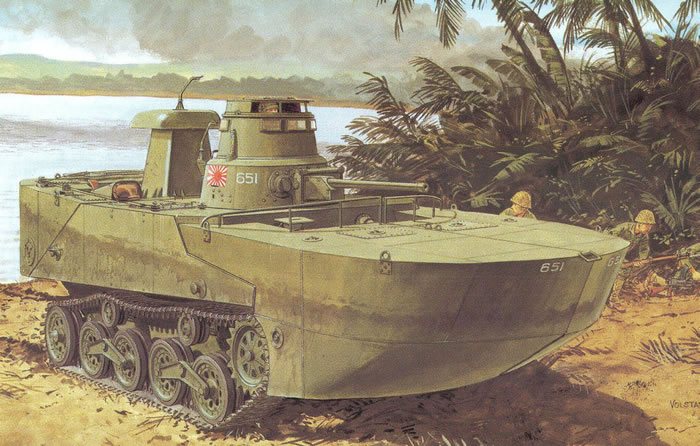
In order to have true sea-keeping qualities, the vehicle must have a sufficient buoyancy reserve or it will quickly be swamped even in a mild sea state (think of the DD tanks at D-Day). The Japanese approach was to make a larger, roomier hull but add large and bulky pontoons at the bow and stern. Essentially the Type 2 was a seagoing derivative of the land-locked Type 95 Ha-Go but with more than enough sea-going buoyancy. The Type 2 Ka-Mi (a 1942 design) was the most prolific amphibious tank with about 185 of them being built during the war. It did mount a 37mm cannon and two 7.7mm machine guns, one of which could only be used when the bow pontoon was dropped. The vehicle weighed 13 tons with the pontoons mounted, and 10 when they were dropped. It was followed by the much larger and heavier Type 3 “Ka-Chi” and Type 5 “To-Ku” amphibious tanks with 47mm guns, but neither one of them was much of an improvement.
Using mechanical components from the land-based Type 95, the Type 2 used a new hull design with pontoons held in place with “claw” type clamps that could be jettisoned from inside the tank when the vehicle no longer needed them. Divided into separate compartments, the pontoons gave excellent buoyancy at sea and proved to be effective. But like all amphibious tanks designed to be amphibious first, it was thinly armored and quite vulnerable to mines. Few actions were carried out by Type 2 tanks with their amphibious qualities put to the test, and most were forced to fight on land which was not their strong suit. As a result, they were encountered by US forces starting in 1943 but quickly eliminated. One example captured by the Soviets (with its pontoons!) exists today in the Kubinka Museum in Russia and several others are still found where knocked out on Pacific islands.
This kit is noted as a “late production”model but from what I can tell is essentially the cyber-hobby.com version of the kit with a few minor tweaks and using different parts previously molded on the sprues. It has a total of 110 more parts than the non-amphibious version and shaves US$12 off the price of that kit.
The kit builds on the DML release, which came with a minimal interior but all hatches separate for posing positions. Some interior is included, such as the three-piece “claw” connectors and handwheels, what appear to be two either fuel or ballast tanks, and the machine guns and the 37mm gun with mounting. The new variant concentrates mostly on the exterior of the vehicle with all of the “Rube Goldberg” (or “Heath Robinson”) gizmos and devices needed to hold the entire assembly together.
Assembly mirrors the earlier kit through step 7. Initial assembly begins with making sub-assemblies of the wheel bogies, idlers, clamps, muffler, main engine hatches, and interior tanks. These are installed in Steps 2 and 3, which also cover the assembly of the upper glacis and bow machine gun. Step 4 covers the assembly of the engine deck (which is cemented in place as the kit comes with no engine!) and upper hull details. Step 6 covers cementing the upper and lower hulls together and initial assembly of the 37mm gun.
The gun is a typically over-engineered Japanese weapon of the time and the kit requires 15 parts for it and its coaxial machine gun to form a single unit. As this gun is only about 50mm long on the kit, that’s a lot of parts for a very small gun.
Step 7 is when you begin to work on the pontoons. This kit offers three different ways to assemble them: Leyte Ormoc style, Kuril Island style, or one captured by the US. These are complex affairs and the mold makers have attempted to get it right, but there is a seam between the left and right halves of the bow pontoon (parts L1 and L2). The directions are very confusing here, as the attachment devices (either parts M8/M9 or B19) are for “disconnecting”. One is the open claw (B-19) and M8/9 are closed ones, so apparently you use M8/9 when the pontoons are mounted and B19 if they are not. You also mount the engine radiator intake trunk (parts J12-14-18/19) in this step.
Steps 8-11 cover the turret and its details, which are many and pretty clunky in design (not DML’s fault – speak to the original managers on that one...) The turret comes with a ring and drive as well as optional choices for the viewers and periscopes. Also a choice of what appears to be an AAMG mount on the rear of the turret is offered. However, in step 13 you also install the conning tower which consists of four parts plus six clear styrene view blocks. It also requires the copper wire be installed to the rudder control and rudder yoke at this time.
Lastly are the tracks but as they are DS plastic and identical not a problem in sorting. As with most tracks, DML shows them being installed “V” shape down when looking at them head on. While DS tracks tend to “run large” as most Japanese light tanks are usually seen with loose fitting track this may not be a problem, moreso if used in a diorama and “burned out”.
Technical work is credited to Hirohisa Takada with drawings by Shin Okada.
Four marking options are provided, with all vehicles shown in an IJN olive green; it must be noted that the proper suggested color matches are NOWHERE to be found in the directions!
The choices are: vehicles 651/652, Ormoc, Leyte 1944 (white numbers, Japanese battle flags); vehicle 501, Kuril Islands, 1944 (white numbers); vehicle 179, Unidentified Unit, 1944 (white numbers); Unidentified Unit, 1945 (Japanese battle flags only). Decals are a targeted set from Cartograph.
Overall while I profess I cannot find any major differences from the earlier cyber-hobby.com kit this is a wide release at a lower price, which should be appreciated.
Sprue Layout:
A 25x2 Road wheels, drivers, return rollers, bogie assemblies
A 12 Idlers, final drives, details
B 63 Clamps, locks, pontoon fittings, upper glacis, machine gun, ball mounts
C 49 Gun, turret details
D 47 Propellers, skegs, hatches, handles, tanks
F 7 Clear styrene
G 1 Upper hull
H 1 Lower hull
J 19 Rear pontoon decking, engine intake trunk, conning tower hatch
K 6 Front pontoon decking, rear section
K 5 Additional pontoon components
L 2 DS Plastic Track
L 3 Lower pontoon sections
M 32x2 Pontoon mounts, fasteners, rudders, conning tower
R 6 Clear Styrene
MA 31 Etched brass
MB 1 Copper wire
Thanks to Freddie Leung for the review sample.
Home
![]() Discussion Groups
Discussion Groups
![]() Gallery
Gallery
![]() Articles
Articles
![]() Reviews
Reviews
Copyright
![]() Vendors Room
Vendors Room
![]() Links
Links
![]() Contact us
Contact us
Copyright www.missing-lynx.com 2008