IntroductionNow comes part two of the review encompassing assembly of the Revell Tiger Ausf. H, which represents a very late production Tiger 1 with the low cast commander’s cupola, the steel-rimmed roadwheels, zimmerit anti-magnetic coating and lack of fiefel, air-filters. [Part one can be found at the link below @ Missing Links Review section under Small Scale.] When I began this project in 2004-2005 I was aware of no 1/72-scale aftermarket Tiger 1 interiors as there are now in 2007, so I had to build from scratch. Locations of many interior accouterments and their sizes are largely guestimated as I had no Tiger available for me to crawl around in and measure; please forgive me any errors in this aspect. PART’s etched brass detail fret supplied some interior features. I wish to thank THE MODELER’S GUIDE TO THE TIGER TANK, from Military Miniatures in Review for so much help in correctly detailing my Tiger for the correct time period.
Kit AssemblyHull Assembly 1. The kit hull comes in five parts and assembly went well, with generally superb fit. No putty in the joints was needed. Three ejection pin marks on the inside of each hull side were filled in and sanded smooth since this tank will have a visible, finished interior. 2. The fit of the upper hull roof proved to be overly tight when dropped down into the sponson part of the hull even though the instructions were followed and everything else fit well and looked proper after assembly. This fit problem is significant as it can warp the hull roof. The best fix I can see is scrape the top edge of the sponson sidewalls thinner by a millimeter each side. Fortunately this was successful.
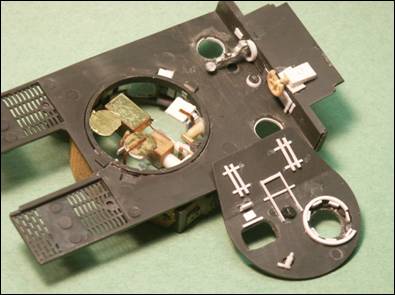
3. Above is a photo of the largely scratchbuilt hull interior made from tube & sheet styrene, and wire. The ammo bins in the hull sponsons are taken from the ESCI Elefant kit (which are totally incorrect for an Elefant of Ferdinand) but close for a Tiger 1. The interior features were based on a compilation of period and museum photos a various Tigers. A notable problem with detailing this way was that the photos were from a combination of early, middle and late Tigers; and all the photos showing the same area of the interior had distinct variations: i.e. interior colors and fittings, and locations of the fittings.
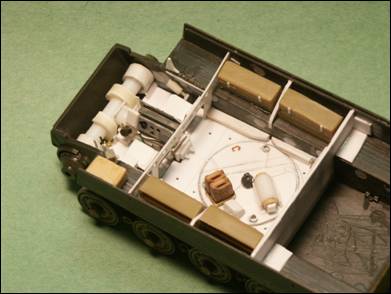
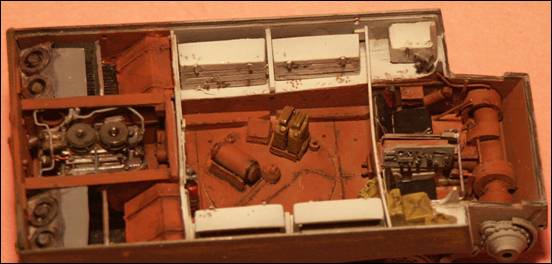
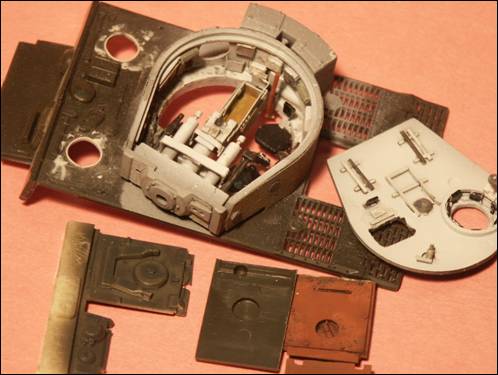
4. Above is the largely completed scratchbuilt interior; the floor and engine compartment are painted in red primer and the upper compartment in flat white. The scratchbuilt transmission, engine air fans and fuel tanks are fairly rudimentary as little of these parts will be seen though the hatches once the roof and turret are on. The MIG Productions’ Maybach HL230 engine has been installed and wiring and hoses added. In modeling the turret floor its important to orient it in the direction you will model the turret turned to.
Turret Assembly 5. In the above scan of the open and unpainted turret is visible the scratchbuilt gun breach, recuperaters, traverse mechanism, storage boxes. The PART brass fret supplies a reasonable shell basket, boxes, and a mediocre commander’s and gunner’s seats. Adding an interior was a series of compromises: going for as much accuracy as possible, against what can really be seen through open hatches with a light. My decision was for as much accuracy as possible. Raised lips have been added around the inside of the driver’s and radio operator’s hatch openings.
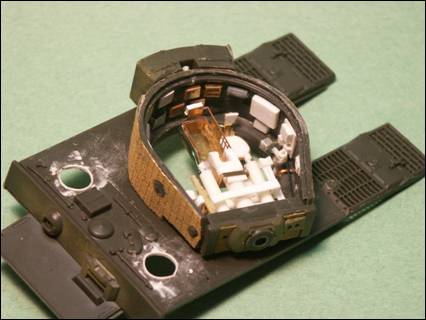
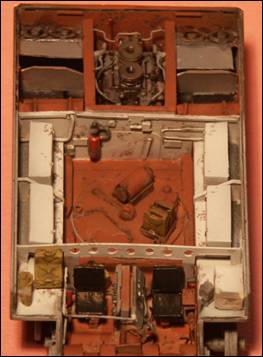
6. The above photo shows the underside of the hull displaying the driver’s steering wheel [yes, a steering wheel, and not levers as is common in tanks of this time]. Also evident is the hull machine gun; the turret underneath with the bottom of the crew seats; and underside of the turret roof showing turret-roof fittings such as the internal gun travel lock. 7. The turret parts fit together superbly. With open turret hatches it is unfortunate that there is a large bulge for the locator pin in the rear inside, but fortunately not too visible in the end. 8. For the late turret we may choose to scratchbuild a Nahverteidigungswaffe (close support weapon, a type of bomb & smoke-grenade thrower in the turret roof). This includes the building an exterior fitting for the Nahverteidigungswaffe since Revell does not include it. It goes in the same location as the roof vent of the early Tiger.
9. A very late Tiger 1 had a thicker turret roof, and a loader’s hatch designed for the Tiger II. While the early Tiger appeared to have a protective ridge around it, the late Tiger loader’s hatch appears flush with the turret roof. In using MIG’s hatch in an open position the molded-on hatch had to be cut out anyway, making it easy to sand down this ridge. Actually, in opening up the hatch it was difficult not to damage this ridge anyway. The MIG instructions are attractive but do not show us how to attach the hatches. 10. The open commander’s hatch needs a grab handle, made from fine copper wire. With an open hatch we will need to add black periscopes on the inside of the cupola, and the shaft and wheel for operating the cupola hatch. The cupola hatch of a real late Tiger lifts and swings to the side.
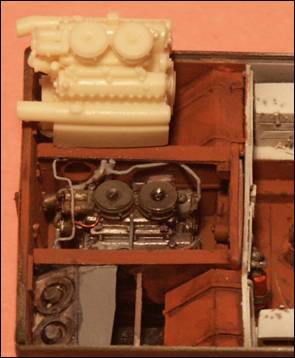
11. Side and front views of the MIG engine installed and with scratchbuilt piping and hoses installed. Another unbuilt MIG resin Productions Maybach HL230 engine sits above it for comparison. . The initial Tiger produced in 1942 used the Maybach HL210 engine with three larger circular air cleaners; so MIG’s engine here [with only two round air cleaners] is not suitable for an early Tiger 1. The radiators and fan assemblies, on either side of the engine, are homebuilt and not very accurate but little can be seen of them after the engine deck is installed. Suspension & Tracks Assembly 12. The torsion bar arms are molded into the hull sides so moving them to simulate the wheels over rough ground will be difficult. This is a common feature of small-scale AFV’s and its very refreshing for a kit to have separate suspension arms. 13. The interlocking roadwheels wheels assembled well and attached to the hull without problems. The inner doubled-roadwheels molded as a single wheel does not show so there’s no need cut a groove along the center. Be sure to leave a millimeter gap between the roadwheels to accommodate the track teeth. 14. Revell’s tracks look great but like many link & length tracks the individual links can be difficult to line up straight. This is my main complaint about link & length, and too often we are also left with a gap requiring half a link; and lets hope this half-link is at a location not too visible. DML’s Tiger/Sturmtiger soft band tracks may be the best compromise (in my sole, humble opinion). To get the link & length tracks correct I advise to attach the individual links around the sprocket & idler wheels first and leave the idler and sprocket wheel loose until lined up with the longer lengths over and under the roadwheels.
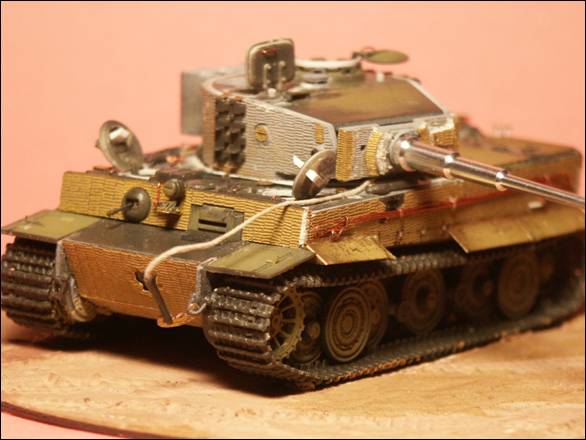
15. Before final detailing the model was fixed to its base with white glue. When on the base the model can be easier handled without fear of knocking off small parts and getting greasy fingerprints on it. This base is made from a CD, sanded to roughen its surface and then plaster spread thinly over one side. White glue and brown acrylic paint was mixed with the plaster to help adhesion and to add color, respectively. Before the plaster fully dried, tank tread and wheel ruts were pressed in. In this above photo of the front-right corner note the etched-brass zimmerit, some of which already has light gray primer. The brass zimmerit generally fit well though with small gaps along the edges that need filling. There is no zimmerit for the top, near horizontal bow-plate in front of the driver’s visor. Most Tiger 1’s I have seen in photos had zimmerit in this location though some did not; I would like PART to have included it so as to give us the option. Note also the copper-wire track-changing cable, brass mudguards, and the turned-aluminum KwK 56 barrel from Aber Company. The towing cables that comes with the Revell model are near twice as thick as they should be so have been replaced by cotton twine covered in white glue to lay down the cotton fuzz. The original cable loop is attached to the bow towing-ring with a brass C-hook. Looking back on the assembly I recommend that you assemble and paint the roadwheels & tracks before attaching the hull sides onto the hull floor and roof. The most common problem with link & length tracks is getting the links on straight and even.
16. The rear of the Tiger, ready for painting. Bullet holes and dents have been simulated in the muffler guards. Brass replacement fenders have been used in the rear though the styrene kit fenders used on the bow. Note the brace for the open gunner’s hatch. The two etched brass circular caps over the top of each exhaust stack had flat tabs holding it up. I believe this cap was part of the fording system to keep water from entering into the muffler. This brass part looked very unrealistic so the tabs were cut off and were replaced with the white plastic rods. The original kit C-hook [located between the mufflers] was shaved off before applying the zimmerit and then re-glued back in place.
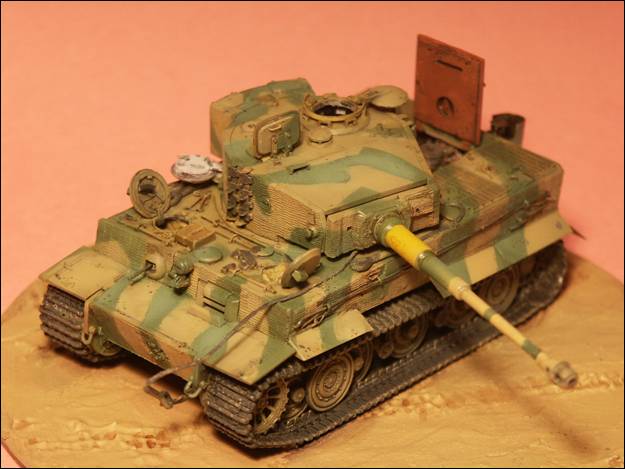
Painting & Weathering17. Above is the model after painting but prior to the markings and final weathering. Prior to painting, it makes sense to decide what paint scheme you wish to pursue, based on the period and locations your model served and your preferences of what you like. I try and pursue historical accuracy but am not obsessive about it. For example. It does not bother me if there are no known photos proving a particularly numbered vehicle existed, though I do wish to get the feel of a vehicle serving in an appropriate period with accurate unit markings and camouflage patterns. Unless a modeler has color photos showing all five visible sides [front, back, two sides and the top] we all have to do a lot of speculation when it comes to the painting and details. After all the smallest details were added and the model glued to its base, small areas of dark gray was applied on small areas where I later intended to show wear and chipping. Using the “salt technique” small areas of the dark gray were wetted, a sprinkling of salt crystals applied and allowed to dry. The salt acts as a mask that adheres well but can be flicked off easily with a pair of needle tweezers after the final painting. A base coat of Model Master Dunklegelb acrylic paint was sprayed over the entire model. The contrasting green color was painted after masking the area with painter’s tape; a tape less sticky than typical masking tape. I have seen varying interpretations of the camouflage pattern for this Tiger tank, either green or brown patches over the dunkelgelb. Tigers from the 3.Kompanie, s.PzAbt 505 were known for the yellow band at the base of the barrel. Yellow modeling paint does not cover well so the entire aluminum gun barrel was primed with light gray first. The photo above is after the final painting but prior to the markings, some additional weathering and final acrylic dull-coat. [Note that a few roadwheels are missing for the planned diorama setting.] Markings18. Techmod #72801 offers a great set of Tiger 1 water-slide decal markings in 1/72 scale. Having a penchant for eastern front vehicles I chose to model Tiger number 312 of the 3rd Company of Heavy Tank Battalion 505 in the spring of 1944 [3.Kompanie, s.PzAbt 505]. This heavy tank battalion served its entire career on the Eastern Front. In addition to the tank tactical number the decal sheet also includes the cross and the unit insignia: a charging knight on horseback. The Techmod decals applied well and nestled down well into the etched brass zimmerit texture with some decal solvent.
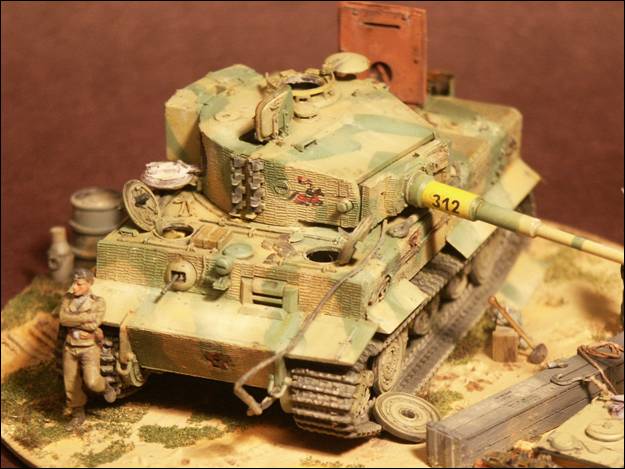
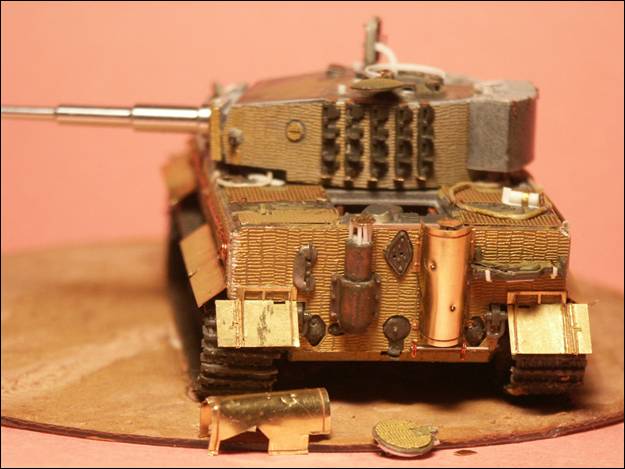
19. Above is a front view of the completed Tiger depicted in a field repair shop. With so many hatches open common sense told me to display it in some state of maintenance. Note the armor-piercing shell impact in the bow that has chipped off the zimmerit. The anti-tank shell gouge in the metal was simulated with a dulled and heated graphite pencil point. The pencil point can be shaped to the size you wish and the heated tip creates a small expansion mushroom. The graphite pencil was also used to show wear on painted edges like grab handles, track links and edges of the armor plates. The undersides of crew hatches are painted the same dark yellow as the exterior. The color of MIG’s engine hatch interior color is red-primer. The two figures are 1/72-scale styrene plastic from Preisser Company. The fuel drum is from MarS Company and the large crate is from Leva productions.
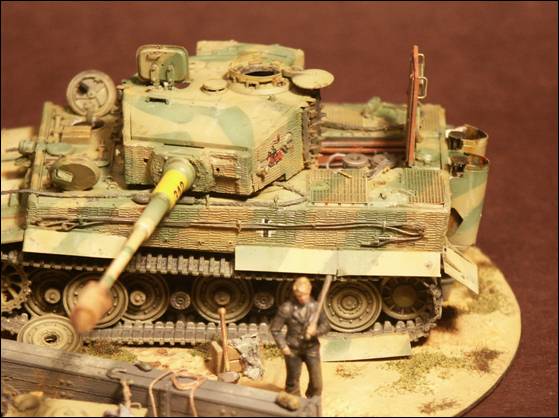
20. The above photo is a good view of the track-changing cable and attachment points on the Tiger’s left side. Note how the Tiger’s turret needed to be turned to the side in order to open the engine hatch. Also visible are the removed roadwheels and small hubs [Part 12A] for the roadwheel axles included within Revell’s kit.
References
Home
Model, Images and
Text by Stefan Szymanski |
|||||||||