|
Oil Paint Rendering - an Introduction |
|
 |
| by Michael Rinaldi |

Introduction
In the past few years, as I produce more and more modeling articles, I came to realize there was always one step that I felt I was never fully explaining correctly, or to its fullest extent, and this was hampering my efforts to completely extrapolate the entire techniques used on each of my models.
When I thought about the singular element to my work that truly makes it mine (that signature process), I have to say it is the use of oil paints in my paint jobs. However, I had been trying to describe my use of oils within the confines of current terminology, specifically “oil paint fading” and “the oil dot method”, neither of which explain my process correctly--nor was it a simple combination of both. So by this notion I had to become responsible for my actions and define this step as a clear and concise technique that I could then refine further into a teachable method.
What's in a name?
I have a formal background in art and design, and the same idea and thought process is used in what is called a rendering. In simplistic terms, a rendering is a piece of illustration or artwork created by its author specifically with the intention to portray the subject matter at its best with a lot of clarity and information over each area.
When this idea is applied to scale modeling, and specifically to my use of oil paints, I realized that I was indeed “rendering” the paint so it could be its absolute best. It was this basic concept that led me to name the technique oil paint rendering (OPR) since it fully encompasses all that I am trying to achieve with this critical stage of the painting process.
By definition this is not a new style, but truly an application technique used as part of the larger step-by-step process of painting and weathering. It can replace and/or augment nearly any other existing method used, and the oils can be applied to any subject, any model, and over any type of paint.
What is the goal of oil paint rendering?
To keep to the rendering concept, I use oil paint to “micro-manage” the colors within each section of a model’s surface to extract the maximum visual effects that I can from each area, with each effect telling a bit of the story about the life of the vehicle. The goal is to show the viewer a level of detail within a paintjob in as strong, or as subtle, of a way that the author of the model intends, thus maximizing the level of information about the model within its paintjob. For example, on the side of a tank there may be tool brackets, shell impacts, dust and mud, stowed gear, you name it…and after the basic paint colors have been applied, you can go back over each area and greatly enhance its visual information by adding specific oil colors that can darken, lighten, fade, tint, streak, diffuse--nearly any effect you can think of--the underlying basecoat to create what you need to clearly illustrate the area.
In the most simplistic definition of OPR, the modeler will apply small amounts of oil paint to the painted model’s surface and then simply blend it out to create certain effects. Each color can be layered over one another to add depth to the finish until the process is completed, which is at the discretion of the modeler.
Why oil paint?
The reason I utilize oil paint is for three very basic and fundamental reasons. One, oils are infinitely translucent. Their opacity range is from 0-100% and this is an extraordinarily powerful thing, thus maximizing the range of values and hues that can be created with them. Two, they are very easy to blend, which bodes well for all skill levels and allows for maximum creativity. And three, they are slow drying and this allows the modeler ample time to control the process to its fullest exten, unlike an acrylic or enamel that have much shorter drying and blending times. In all three cases, I have found oils to be superior to any other medium for this specific purpose and as such they have become forever linked with my models.
Additionally, the results are consistent and repeatable across any skill level, and from there it boils down to practice of the technique that will fully allow the modeler to realize the maximum from this idea. One of the strengths of oil paint rendering is that it can be applied as little, or as much as you require, to any style of paint job imaginable. Nothing is written in stone, there are no restrictions with its use (outside of the basic application technique that works best), the costs are easily controlled because the amounts used are small and the tubes of oil last a very long time, plus there are plenty of product options available from a wide variety of sources.
Prepping the oil paint palette
The best thing to do is to keep it simple and try not to over think what is right in front of you. The painted model will already dictate to you what colors you will need for this step. But because each model is unique and different I will just give a basic outline of colors to use in this introduction article. In the future, I will write specific articles that pertain to very specific subjects and paintjobs.
So first off, you need to prepare a palette, which is very cheap and easy to make. I cut up small squares of brown cardboard--nothing fancy, an old shipping box is perfect. The reason for the cardboard is that oil paint has a product in it called “linseed oil” and is there for the regular artists that paint on canvas, however, for our modeling purposes we actually want it absorbed out of the oil. Why? Because when the linseed oil is absorbed out the paint will be easier to blend, it dries much faster, and (most importantly) dries quickly to a matte finish.
With the palette cut I add a tiny ¼” piece of double-side tape on the back, which will help to keep it in place on the bench (the cardboard is so light, the brush will easily move it around). I then take my oils out and using the flat end of a small artist spatula (I use the Tamiya Paint Stirrer), place a small pea-size amount of each oil color on the cardboard that I want to use on the model. I tend to be fairly organized with this and place similar colors next to each other, which also makes it more efficient to grab each oil color, or mix them together, for each step of the process. When completed, my palette will have anywhere from 10-20 colors on it, but that is dependant on the model itself.
Here is a basic breakdown of the colors I typically use on my palette, and what they are used for. In each color’s case they can be used from 0-100% opacity depending on need:
-
White and light tans/buff – used for general fading, adding dust, whitewashes, and lightening (when mixing) other colors to create additional shades
-
Yellows (from pale yellow to orangish-red) – used for tinting greens and Dunkelgelb paintjobs, plus add light rust tones, or warm tones in general
-
Dark Browns (from rust tones to very dark almost black-brown) – used for shadows, heavy rust, grease, dirt and mud that can be caused by any factor or elements, great for stains too
-
Greens – used to enhance any green or yellow camo, from OD to pale green, also good for green moss and similar plant life, overall limited uses, but very powerful for military models
-
Reds – used to fade/enhance red primer, red/brown camo, and red markings or add any strong red tone
-
Blues – used to fade/enhance Panzergrau, anything with blue camo and markings, etc. Can also be used to tint green paint schemes, such as OD or forest green, for a more bluish tint
-
Black – rarely used, and usually just for the darkest shadows, or darkest oil stains and exhausts, and to enhance exposed metallic edges, also used to darken other colors
-
Grays – used to deaden a color (to make it more neutral), imparts a cool color tone that is good for winter finishes, can also be used to lighten some darker tones, and for fading Panzergrau tones
-
Light browns – used a lot for middle earth tones and summer finishes, often mixed with other colors to create special earth tones.
Brushes and thinner
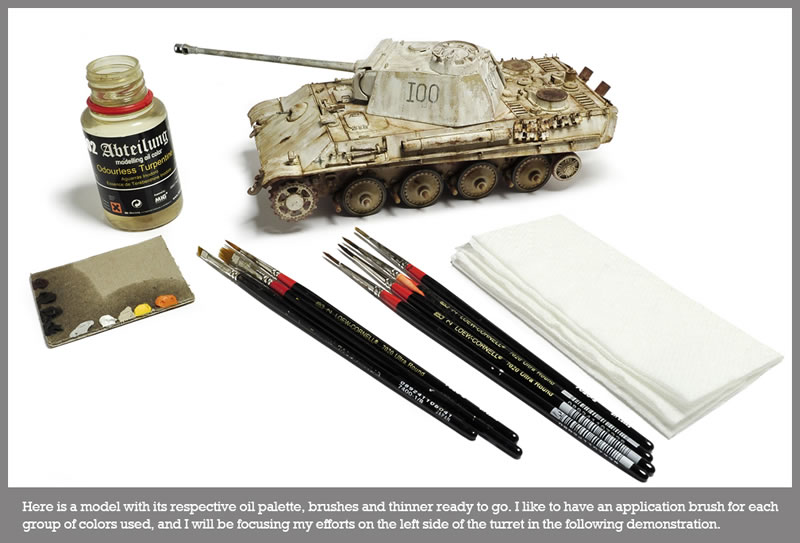
Next up are the brushes. For the application brushes my primary brush preference is for a nice quality #2 Round (such as Loew Cornell’s 7020 #2 Ultra Round). I find the #2 Round maintains the best sharp tip over time, and has enough bristle length to hold plenty of material so it doesn’t dry out too fast.
For the blending brushes I use a couple of different styles. One is a “¼ Filb Rake”, and the other “¼ Angular”. Both of these can be turned on end for fine streaking and the two brush ends gives a lot of variety in how to blend the oil into the surface, which can vary from vertical to horizontal in nature. I also keep a clean #2 Round handy for more precise blending as well.
For the thinner, I use high-quality odorless turpentine. I strongly recommend at least a quality art store brand, and better still--use the 502 Abt. “Odourless Turpentine” from Mig Productions, or the new AK Interactive “Odourless Turpentine” product. These are the best products available for our use. I do not recommend using enamel thinner for this technique because it does not provide the right consistency for blending, and is too strong of a thinner in general--plus it smells terrible for prolonged use.
Application method
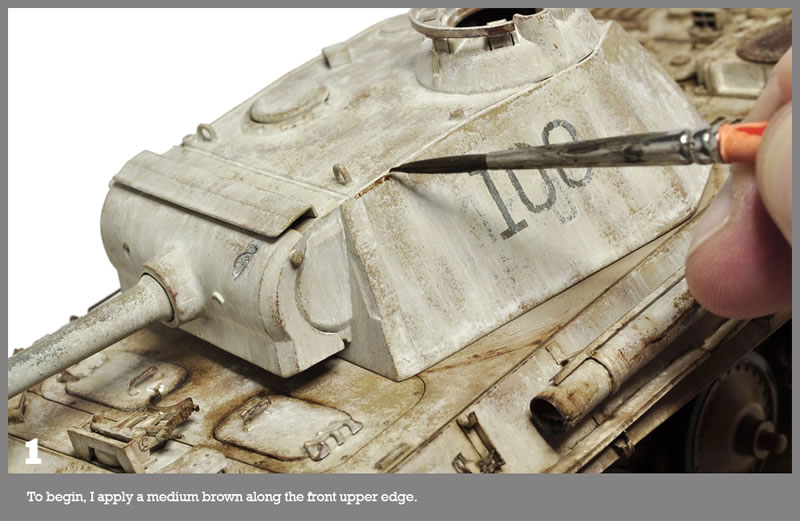
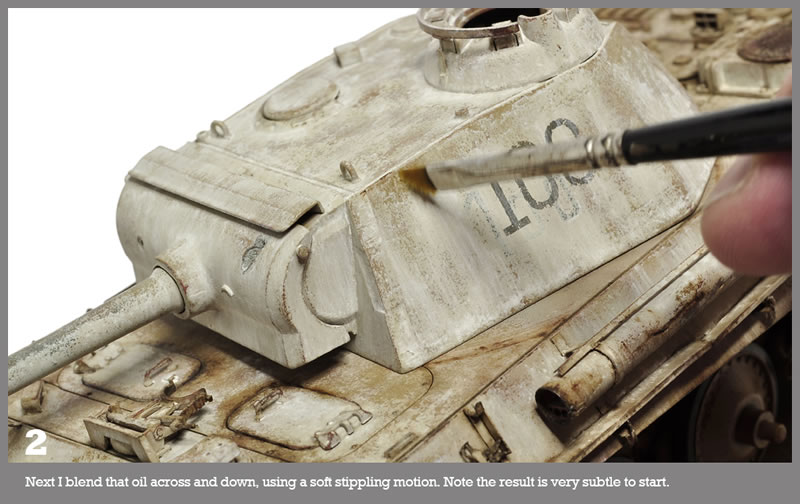
The actual procedure for the technique is quite simple. It entails taking an application brush, dabbing it in the oil needed, and then painting (or placing) that oil exactly where you want it, followed by a quick blend with one of the blending brushes. It is very important to make sure the blending brush is nearly dry with only the slightest amount of thinner on it. (I use a paper towel to unload my brush on before blending it.) In most cases, the drier the blending brush, the better. And clean it often, this is also very important. However, I do recommend practicing this first to see how it performs; only by doing this can you clearly see the quantity of thinner needed. This process is then repeated for as many times and colors, as you require. The adage “less is more” is very pertinent to this technique--a little goes a very long way.
As for surface quality, I tend to work from a matte-to-satin level of finish in my paint jobs. After the proceeding filters and pinwash steps, I might spray a light varnish coat on top, however, the results of the blending are more dependent upon the quality of the initial basecoat than anything else. It is important to create a quality paintjob at the airbrushing stage. I do not usually use gloss varnishes with my models, because the blending is more slippery and harder to control on the smoother gloss surface, which is why I prefer a more matte/satin finish for its inherent grip of the oils. I do not seal the model afterwards either, otherwise you will lose the myriad of subtle sheens created that are important to the overall final aesthetic.
Regarding the colors themselves, some are more difficult to use such as white, for example. Adding white to a darker base coat could quickly stain it and make it hard to blend out, so I recommend pre-wetting a surface if you are experiencing this particular problem.
Note: I always recommend a test run on a scrap model anytime you use a new product or technique for the first time, this will give you a lot of help to see how it is going to work for your project.
When is it best to use the oil paint rendering step?
I typically use this technique after the model has been painted in base colors and camo; the markings are applied; the tools, the tires and details painted; a filter has been applied; and the first pinwash is applied. From this point on, I will use the oil paint rendering step right up to when I apply the pigments, which is typically near the very end of the weathering process. Once pigments are on and set in place, I will continue with more OPR to create as much harmony and balance on any area that it is needed. The basic principle in action is that I layer all of the methods on top of one another to create as much depth and interest to the finish as I can. However, there is no hard rule, or clearly defined limiting factor, on when to start or stop using it on a project.
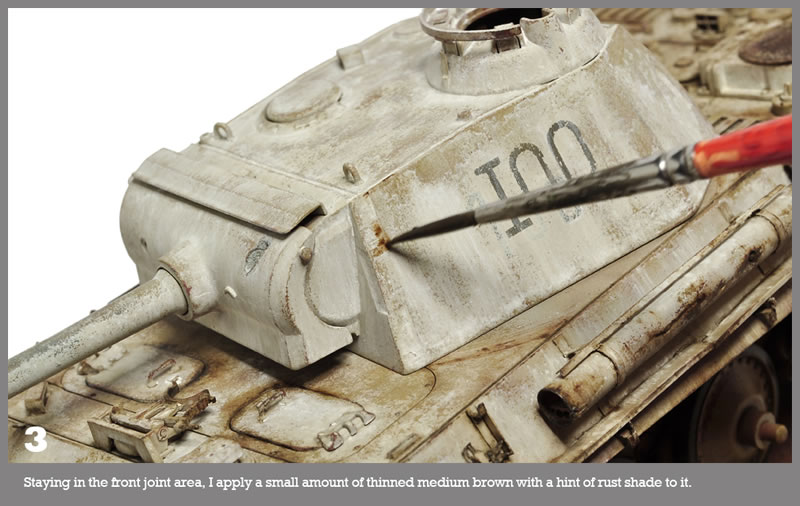
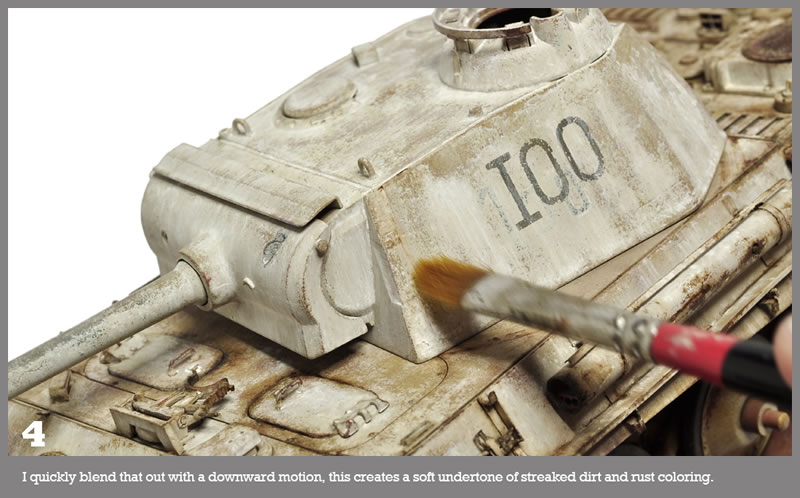
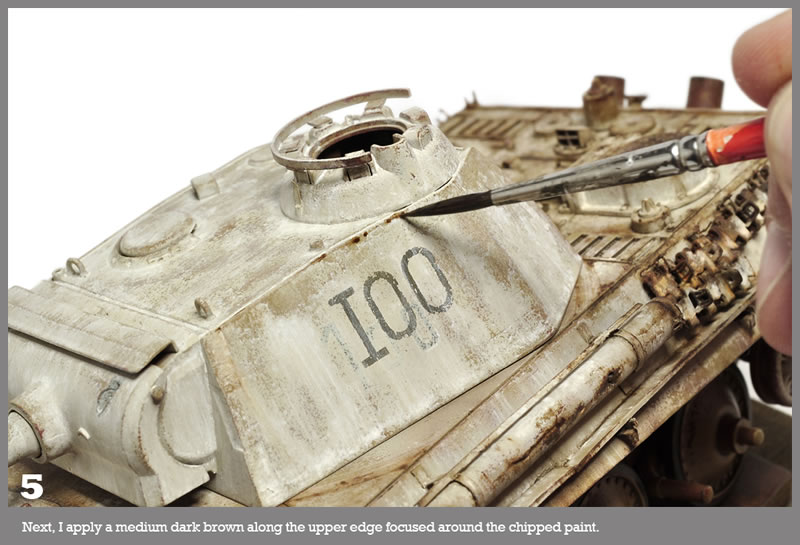
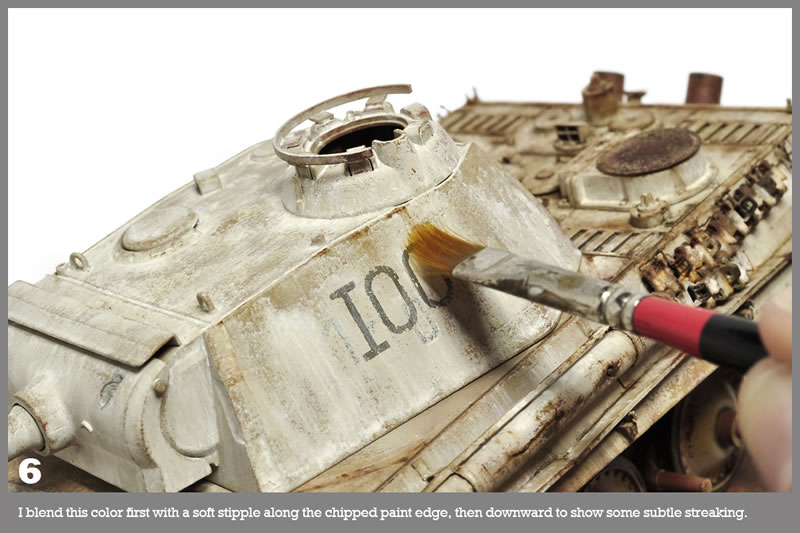
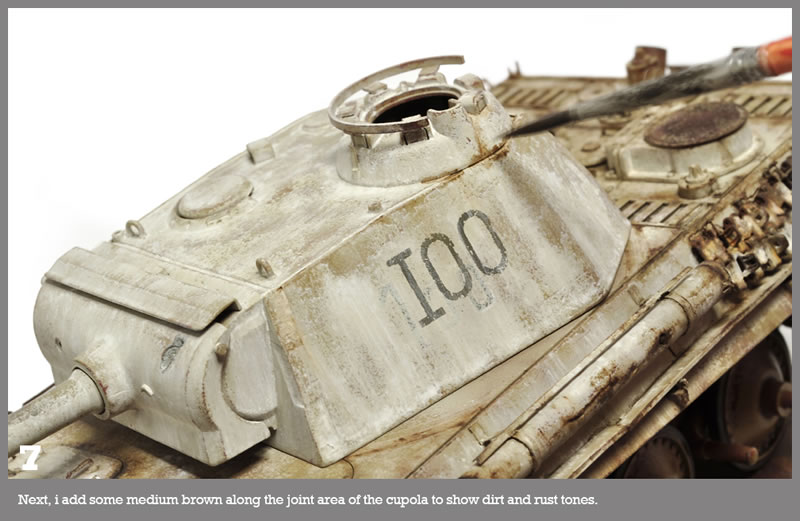
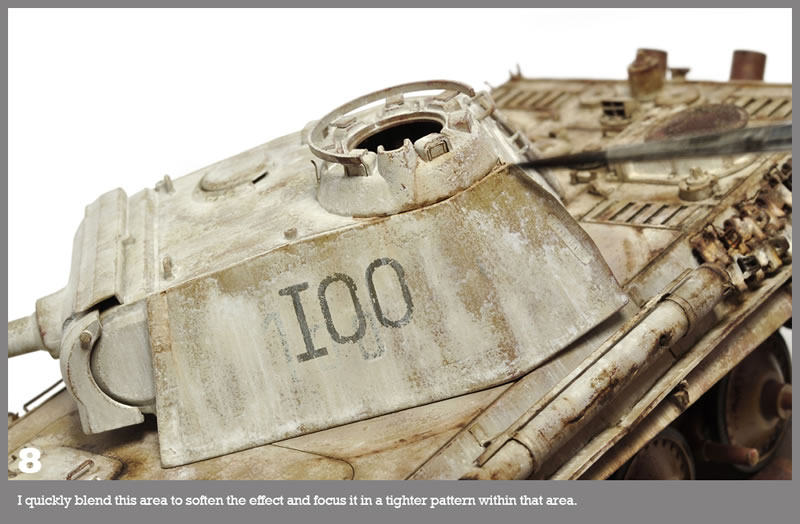
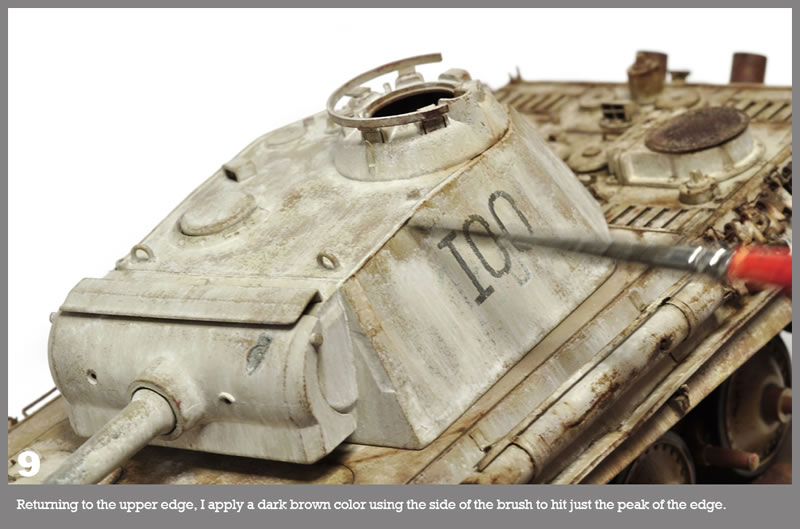
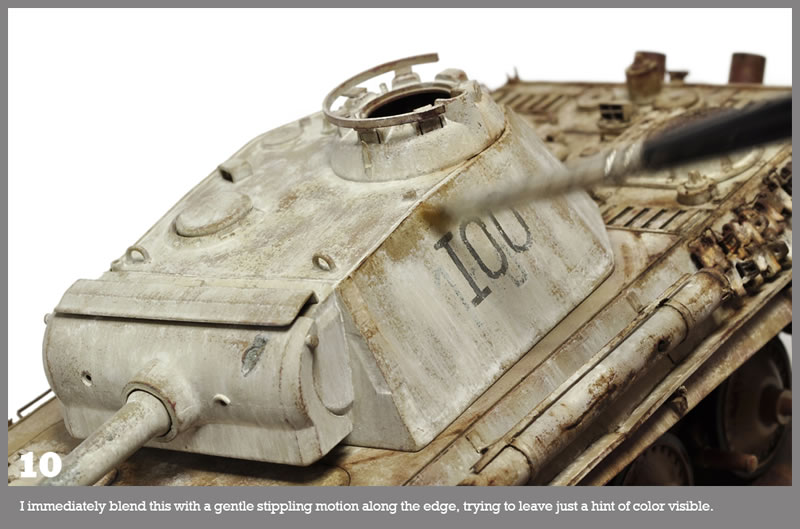
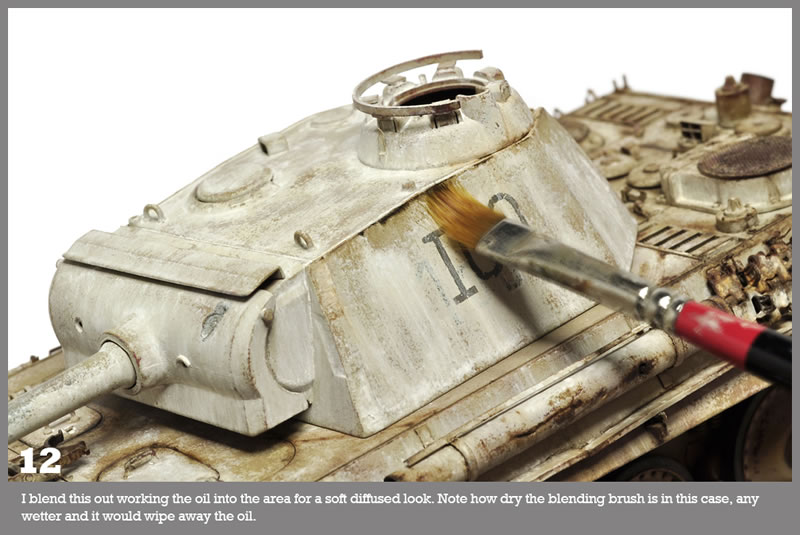
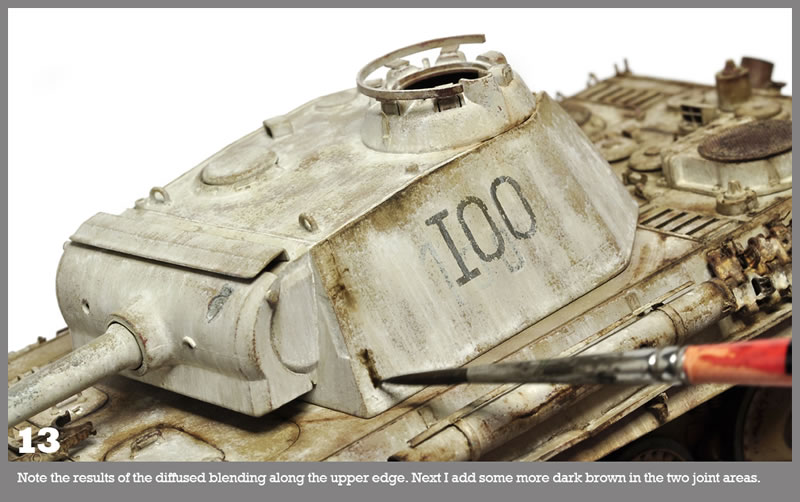
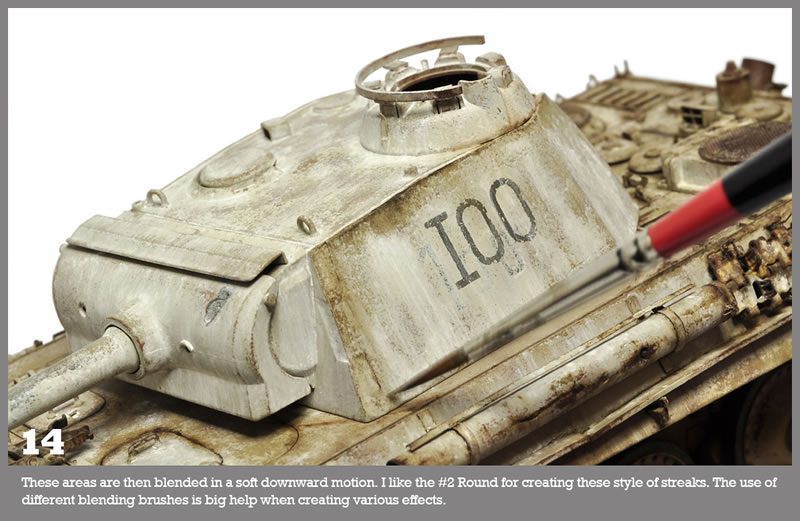
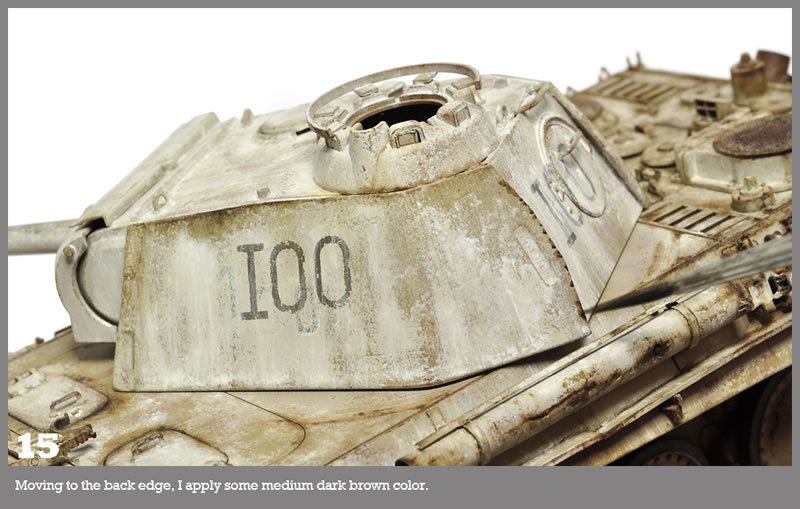
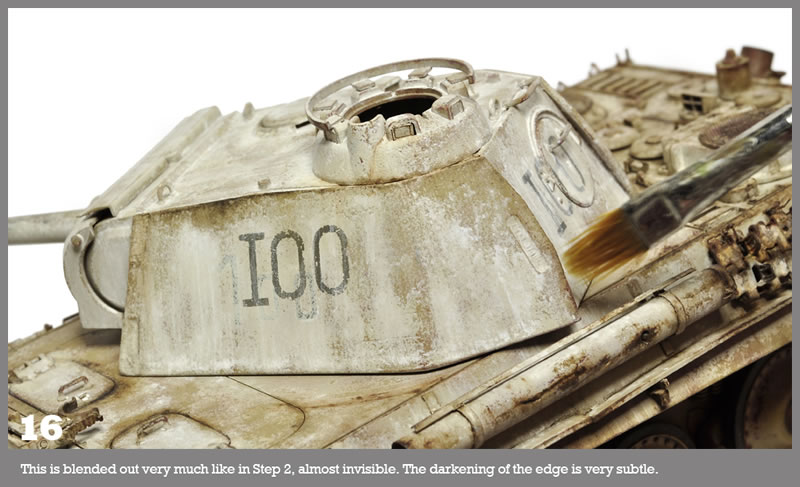
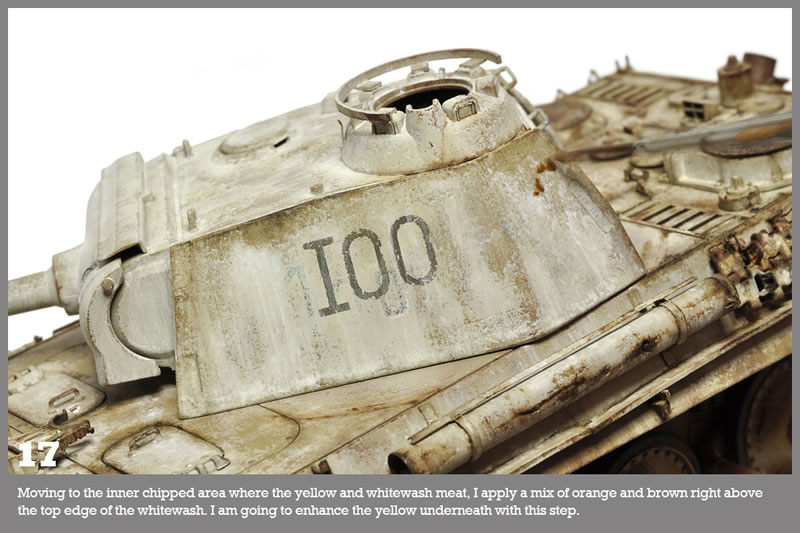
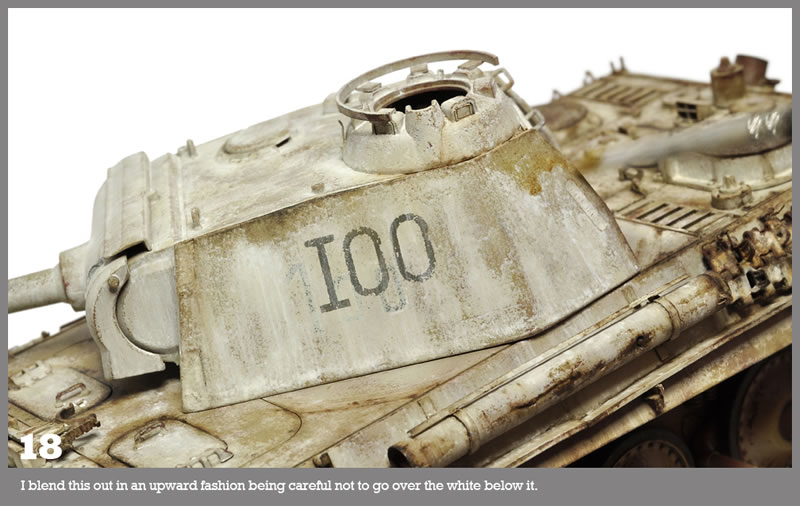
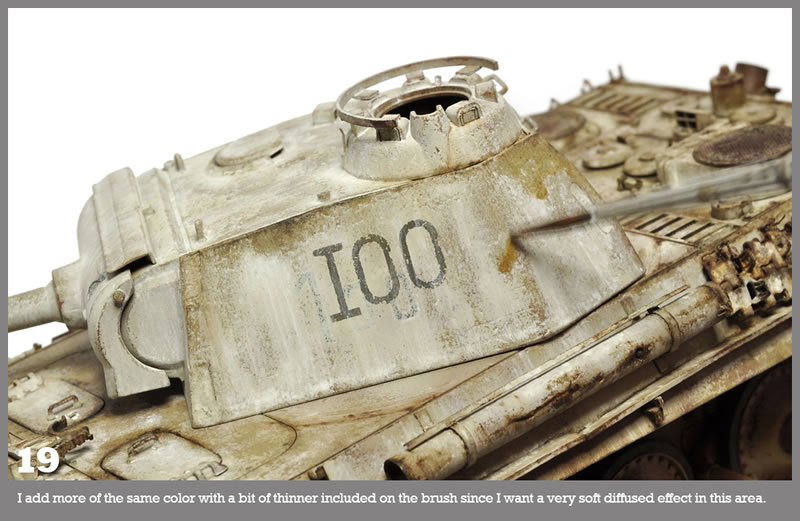
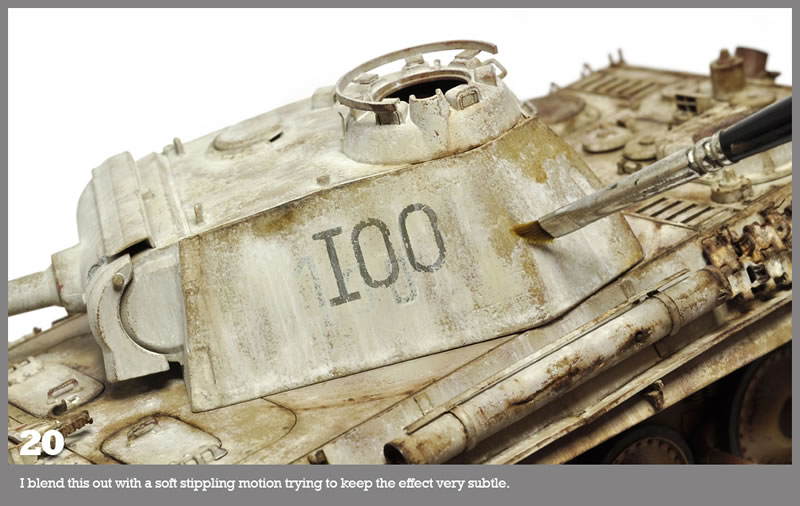
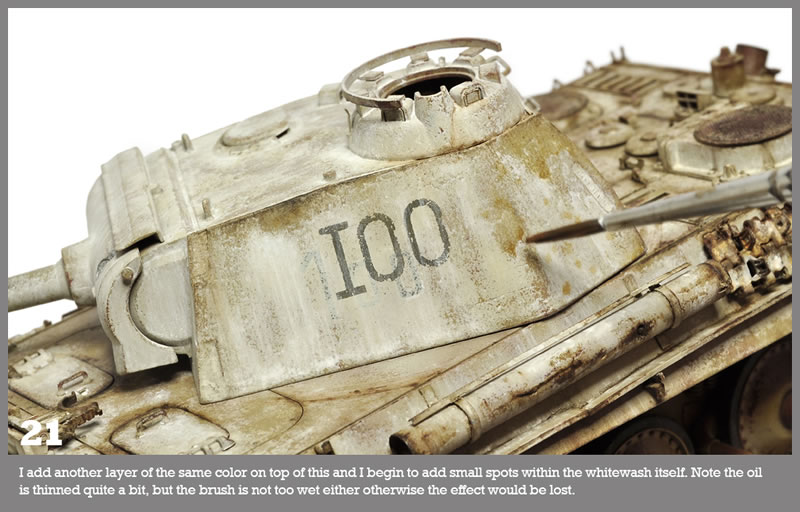
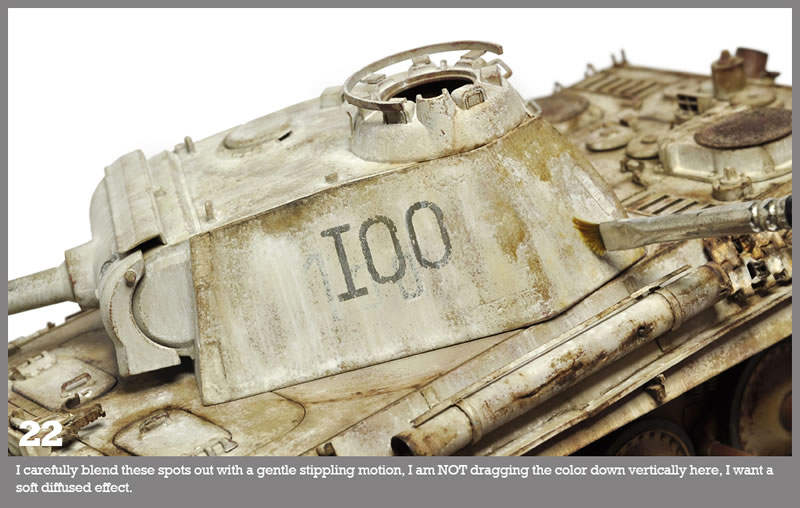
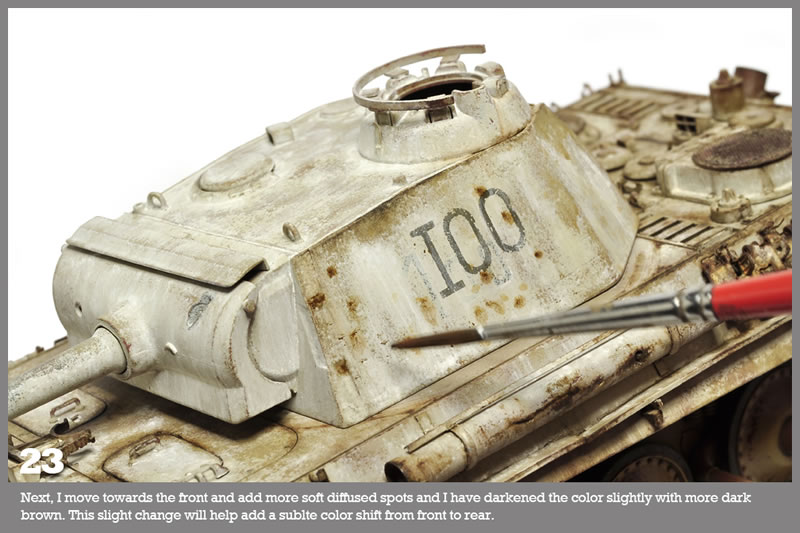
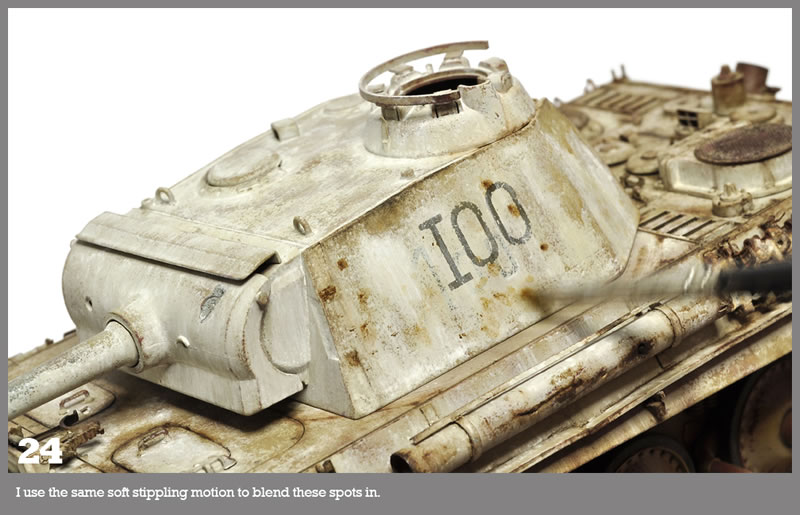
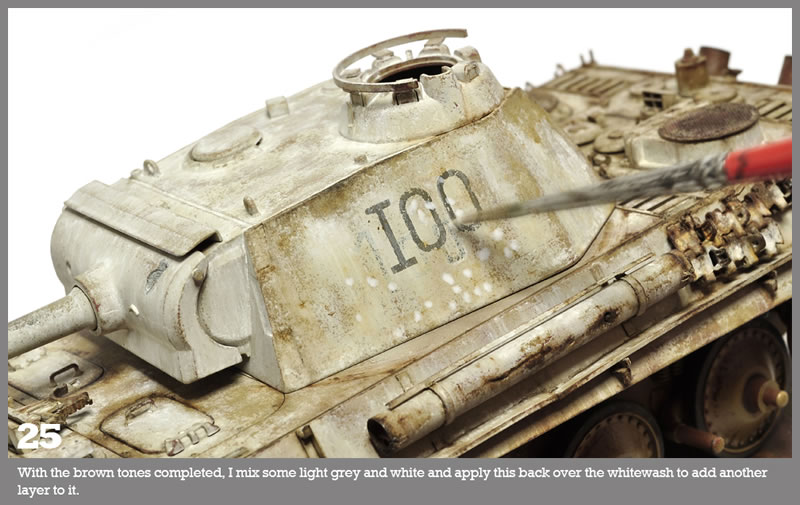
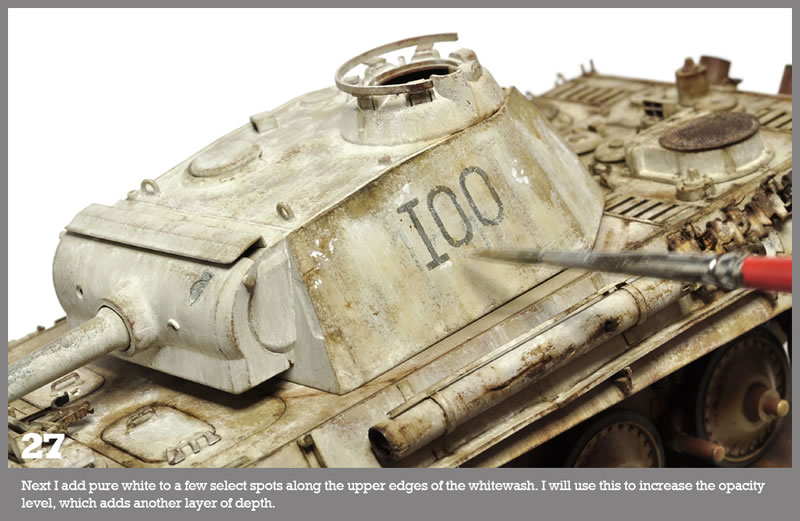
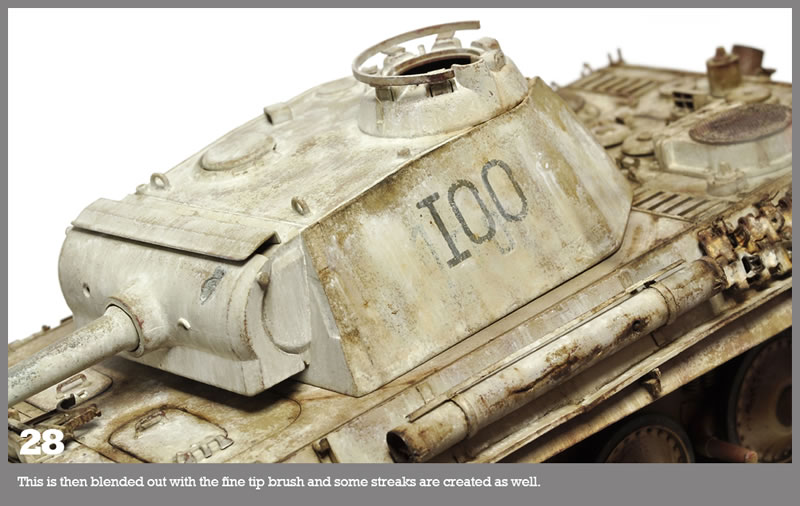
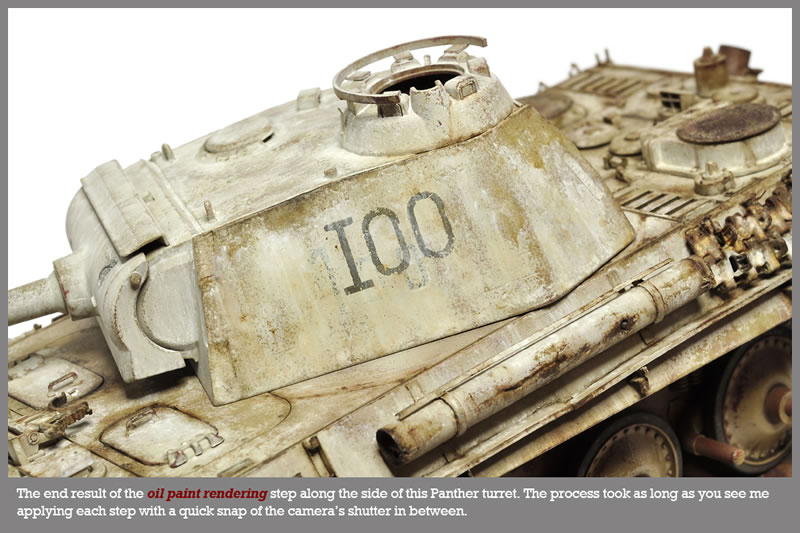
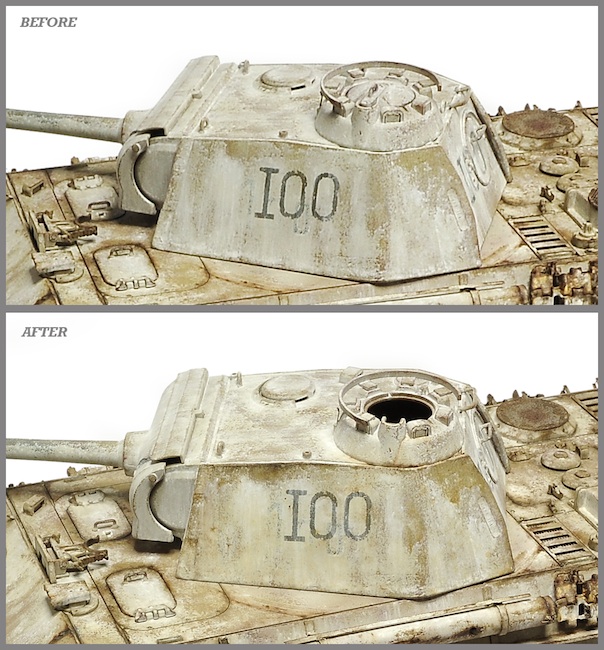
The SBS photos of the application process
For this winter whitewashed Panther turret I am using a simple brown-based color palette, with the intent to primarily show the correct application technique. The plain sides present some unique challenges without a lot of bolted-on detail to enhance, and this is very typical for a lot of clean surfaces. Also, please note the fundamentally dry appearance of the blending brush.
In addition, stippling (the process of dabbing the brush on the surface) is a very crucial blending technique that is used to achieving certain effects like diffused colors, since not everything is always streaked downward (even on a vertical surface like this demo subject), and this will usually depend on the effect needed and its location. These photos were shot sequentially, and please note how I layer the colors on top of one another (usually from light to dark) to maximize the depth of tones possible in a given area.


In Conclusion
Hopefully this introductory article demonstrates the idea behind my new oil paint rendering technique. I have been using this process for a long while now and it has been the indelible element to my painting that truly makes my models unique. Using oil paints in scale modeling is not a new concept, but the degree to which I am using them, and the broad spectrum of results attainable has concluded that I can only provide the fullest extent of this information by establishing it as a viable and teachable technique with its own terminology so others in the hobby can also gain from its use, both by discussion and execution of it on your own work.
Additionally, this technique is not intended as a fast method, and usually takes a few periods of time at the bench to complete, especially with the first application layer. The modeler must be thoughtful in what colors are applied where. As mentioned above, it is intended to enhance every area of the model and there is no right or wrong way with its use.
I would also like to personally thank Mig Productions, USA and AK Interactive, USA for their continued support of my work. The products provided by them are truly of the highest quality levels for scale modeling and I highly recommend both brands. I would also like to thank Richard Williams, Tracy Hancock, Mario Eens, Staf Snyers and Adam Wilder for their advice in writing this article.
Model, Images and Text
Copyright © 2011 by Mike Rinaldi
Page Created 24 Juy, 2011
Page Last Updated
25 July, 2011

|