
T72M1 Russian Army Tank

|
History In the late sixties, a replacement for the inadequate T62 tank was to be developed. The chief engineer of the program, eager to be remembered as the man who created a Soviet tank superior to those of Western Europe (as the T34 was in the forties), came up with a very advanced design. The T64 incorporated a smooth bore, fully automatic 125-mm gun packing a tremendous punch and was driven by a 760 horsepower engine. The automatic loader meant that the turret could be made smaller which in turn resulted in that thicker armour could be used and still keeping the weight down. The (relatively) low weight in combination with such a strong engine resulted in a tank with awesome mobility. But the problems couldnít be ignored, the gearbox broke down, the engine caught fire, the tracks went to pieces and the autoloader jammed all to often. To solve the problems, a new tank was constructed in order to make the concept more dependable Ė the T72 saw the daylight. Even if the external appearance was almost identical, it really was a new tank. The T72 was up armoured, had a stronger engine and more reliable electronic equipment. After the teething problems had been dealt with, the new tank proved to be both reliable and versatile and soon became the main battle tank of the armies of the Warsaw pact. The T72 was intended to have been phased out of service by the T80 in the eighties, but itís still going strong in the Russian tank divisions.
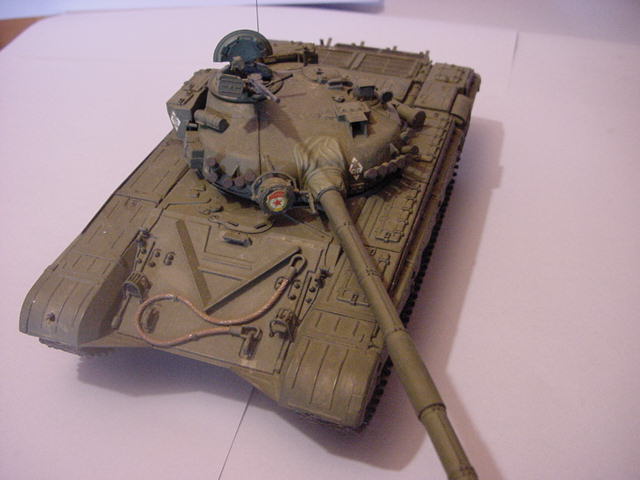
ConstructionWhen I started, I had no intentions to use after-market accessory kits, simply owing to the fact that they arenít being sold anywhere near me. In fact, it took me over 10 weeks to receive the model. My references were limited to the Internet and the two-page detail drawings, which comes with the instructions. But it didnít turn out to bad after all. Tamiya item 35160 dates from the early 90ī and the age is beginning to tell on some of the frames. Construction is very easy, much thanks to the instruction chart and there are few things to worry about. To start with, the open backs of the suspension arms were filled with Italeri putty and then sanded flat to give a more realistic impression (for those who suddenly gets a unstoppable desire to inspect the bottom of the tank). The dozer blade (part B20), used for self-entrenching, is moulded in one piece together with the lower front armour. This is to ease up construction but it also gives the impression of one piece of solid armour instead of a blade strapped to the front. I used the-ever-useful carpenter knife to make the blade stand out by scorching the edge between the blade and front-plate. The road wheels was piece of a cake, at least I thought so. It wasn't until they sat on the tank that I discovered that the black paint of the tyres was to faint, I didnít bother to something about it so I just left it and hope that no one will notice. The drive sprockets on the other handÖ The first one went together without problems and it was with that in mind that I put glue onto the pieces of the second one. Big mistake, all three parts showed to be slightly deformed in the points of attachment. The sprocket got a twisted form and there was no chance that it would fit to the tracks. I use Humbrolís liquid poly for my models, yet another disadvantage of living where I do since itís the only useable glue available, and it showed when I tried to separate the parts from each other. It became really messy before I finally managed to get it together. So: DO NOT NEGLECT THE DRY FITTING PROCEDURE. Also notice that the idler wheels have a black rubber rim, they donít point it out in the instructions but its visible on the parts where it is. From what I could tell, the upper hull had no pitfalls and the only thing added were a piece of plastic inserted into the driversí front periscope in order to simulate glass. Itís a simple procedure and really enhances the impression of the vehicle. Then I turned my attention to turret. First of all I painted the inside matt black to compensate for the lack of interior. In front of the box containing the laser range finder there are two plates (right/left) giving side protection for the lens. There should be a narrow hole in the left one, allowing the wiper blade to reach the lens. Itís not there on the model, so I cut it out myself. No lens for the range finder is provided so I made one out of a piece of plastic, unlike the divers' periscope there are no edges that can support it so it can be a little tricky to make it stay but itís possible. Since I had decided to build the Russian version, I had to drill out five holes where two different kinds of parts (A29, B81) were supposed to attach later on and glued the halves together. The electric wires for the smoke dischargers are not moulded on the turret and were thereby simulated by copperwire. The large seam at the backside of the turret was smoothed out with putty, which was stippled with a brush to simulate the rough texture of casted armour. I turned the commanderís cupola 180 degrees to give the model more of a personal touch. Itís simple, just cut a new location hole at the opposite side of the original one (part B 58). The hole I made became so narrow that I didnít have to glue the cupola to the turret, it stayed on anyway. The solid grab handle for the Commanderís hatch annoyed me, so I cut it off and replaced it with a short piece of copper wire. Gluing it proved to be difficult, it came off three times before it decided to settle. The glass for the periscope beneath the Commanderís searchlight was fabricated from scrap plastic. The NSVT Machine gun came together without any problems but afterwards I think I would have decreased the angle by cutting part B 39 in half and sanded it shorter before gluing the gun together. Dry fitting the main gun to the turret showed that the chin of the dust sleeve touched the hull when reversing the turret. By time it would wear down the paint if not taken care of. So I sanded down the chin until I got an acceptable gap between the gun and hull. Remember how I told you about the age showing on some of the parts? Well, you really notice it on the smoke dischargers (A3, A4), they all have heavy mould seams that needs to be taken care of. The radio antenna was made of stretched sprue and polished with pencil led which gave it a metallic shine. One of the few things left to assemble was the fuel drums that attaches to the rear of the hull. The drums went together without any problems, but the fuel drum piping proved to be a different matter. There are two different kinds of tubes that makes the piping, a spring tube and a vinyl tube. When I tried to find the spring tube, I couldnít find it. Most of you should know what Iím speaking about, that black hole that seems to eat up parts from time to time. You could use the vinyl tube for all the piping but I chose to leave off the drums. So, I had to remove the location pins on the racks. But at this time the fuel drum racks were firmly glued to the hull and there was no way it was coming of without a blowtorch. Well, the job had to be done, so I started sanding, I sanded, I sanded and I sanded... And then I sanded a bit more. It was not easy, I tell you that. The result was not as bad as I had expected and the tank looks pretty good without the fuel drums. Next came the unditching log (part B47), which sits right under the fuel drums. The log is nicely moulded and makes a realistic impression once painted. Since the fastening straps for the log are missing I made them myself of a masking tape cut to size and painted black. Thereíre markings for four different countries included in the kit. Russia, Czechoslovakia, Poland and Iraq (I think). I chose the Russian vehicle, simply because of the red star that goes on the main searchlight. The commander is equipped with night vision binoculars but I was too lazy to attach them, so I left them of. I repositioned his arms, which makes it look like heís shouting. I used an old toothbrush to sprinkle brown paint over the vehicle in order to simulate mud stains. I found this kit to be a joy to build and well worth the price. Buy, build and enjoy. |