
Kendall Model Company M3 75mm GMC
by John Prigent
Kendall Model Company M3 75mm GMC
by John Prigent
A HALFTRACK WITH A PUNCH
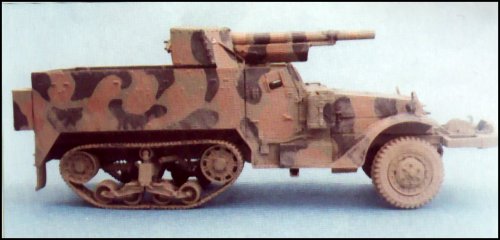
The M3 75mm Gun Motor Carriage was very much a full-size conversion,
mounting the US-built version of the old French "soixante-quinze" on an
M3 halftrack to produce a self-propelled anti-tank gun. 2,202 were
built, making it the most numerous halftrack variant after the M3 personnel
carrier itself, and it saw service with the US Army in the Philippines
fighting of
1942 and in Tunisia, with the support companies of British Armoured
Car Regiments in Italy and North-West Europe, and with the US Marines in
the island-hopping Pacific campaign. This gives a fair variety of
finishes to choose from!
The new Kendall Model Company conversion kit comes in resin and etched
brass, and to build it  you'll
also need the Tamiya kit of the M21 mortar carrier - sometimes hard to
find, but worth seeking out for this conversion because Tamiya's other
US halftrack kits have different rear bodies. Their M16 kit has lowered
flaps on the body sides and rear, provided on the real thing to allow for
traverse of its gun mount, and their M3A2 has so much moulded detail to
remove that in both cases it's easier to make new sides and rear from plastic
card - so look for the M21 instead and save some work.
you'll
also need the Tamiya kit of the M21 mortar carrier - sometimes hard to
find, but worth seeking out for this conversion because Tamiya's other
US halftrack kits have different rear bodies. Their M16 kit has lowered
flaps on the body sides and rear, provided on the real thing to allow for
traverse of its gun mount, and their M3A2 has so much moulded detail to
remove that in both cases it's easier to make new sides and rear from plastic
card - so look for the M21 instead and save some work.
STARTING WORK
The chassis can be built as set out in Tamiya's instructions, but leave
off the winch and its drive shaft unless, like me, you fancy building one
of the few M3 GMCs to carry a winch. If you do, leave the drive shaft
off until the cab is fitted - it has to go through a hole in the radiator
which is tricky to fit over it, but it pops into place easily at a later
stage. Kendall provides a resin
front roller and its mounts, which I dry-fitted for one of my photos
to show you how good it looks. If you use this the 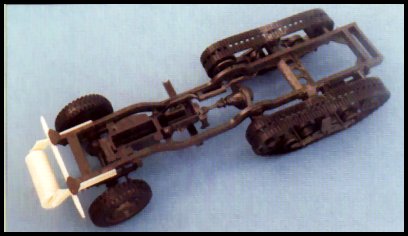 horizontal
plates on the front of the chassis must be removed, as they weren't used
with the roller.
horizontal
plates on the front of the chassis must be removed, as they weren't used
with the roller.
The cab is built straight from the Tamiya box, except that its armoured
windscreen is replaced with Kendall's resin part. This reproduces
the type fitted to the M3 GMC, hinged at the bottom instead of the top.
Kendall provides neat etched brass hinges to fit against it it you pose
it up. Unfortunately it isn't a perfect fit that way, being a straightforward
oblong although its sides should slant to fit the cab front, but this isn't
really noticeable so I didn't modify it. .If you want the windscreen
dropped ready for action, you'll need to modify Tamiya's screen side pillars
which have a triangular section to fit their glazed screen surround (which
isn't used for the M3 GMC). Cement plastic strip to them, let the
cement dry and then file the pillars to a square section.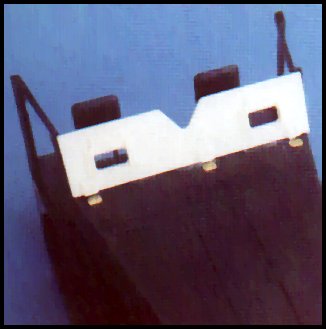 The
cab needs no changes on the inside, and the instrument panel paints up
nicely. Note that the American dial faces were white with black needles
and markings, not like modern car instruments with black faces and white
markings. The seats should be khaki or perhaps light olive drab cloth,
the gear levers had black knobs, and the rest is olive drab. You'll
find it easiest to leave off the steering wheel (probably also black) until
the rest of the cab interior is painted.
The
cab needs no changes on the inside, and the instrument panel paints up
nicely. Note that the American dial faces were white with black needles
and markings, not like modern car instruments with black faces and white
markings. The seats should be khaki or perhaps light olive drab cloth,
the gear levers had black knobs, and the rest is olive drab. You'll
find it easiest to leave off the steering wheel (probably also black) until
the rest of the cab interior is painted.
ALTERING YOUR BODY
No, not a session in the gym! Here's where you need some care,
because Tamiya's body floor has to be cut so the Kendall parts can fit.
First, do the easy bit by cutting the back wall as shown in Kendall's instructions
- and do note that the back wall is the one without a notch in its top
- I nearly cut the wrong end which would have been a disaster! Saw
down each side of the area to be removed, then scribe across between the
saw cuts with a sharp blade guided against a steel ruler. Finally,
snap the surplus section away and file the remaining edge flat.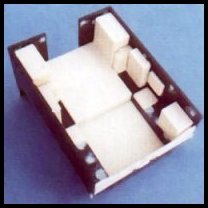
Now you'll have to cut away a section of the actual floor. This
is not so easy, but tackling a bit at a time makes it fairly straightforward.
Use your saw at an angle and cut from under the floor to remove as much
as you can - I can't give precise directions where to cut, just study the
part and saw slowly! Take care to leave the front uncut, and as much
as you can of the centre floor which you'll need to support the resin floor.
When you've sawn all you can reach, scribe the rest with your knife blade
before snapping the surplus away and smoothing the edge.
Fill the ejector pin marks in the plastic, then fit Kendall's floor
sections. Finally, cement plastic card into that notch in the front
wall to fill it. Now you can set to wrok on the sides and rear.
Remove the "hinges" on them as shown in Kendall's instructions and use
strips of plastic card to fill the locations for the mine racks which few
M3 GMCs carried - unless you're modelling one from a photographs which
shows them fitted, of course. Fill the ejector pin marks inside these
pieces and add them to the floor, then fix Kendall's resin front wall in
place.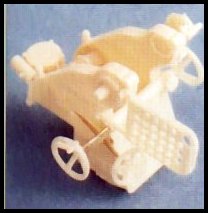
Remove the unused locating ribs inside the body, then add the new fuel
tanks and other fittings - the two filler caps on each tank are different
sizes, the larger ones going to the inside. You'll need to trim the outside
bottom edges of the tanks and jerricans to fit over the floor's locating
ribs - just file a chamfer along them, it won't show when everything's
in place. Now
cement the cab to the body and paint all the undersides and chassis.
I used Humbrol 29 dark earth overall to model a dirty vehicle, but use
olive drab if you prefer a clean one. Paint inside the body now,
in olive drab, as you won't be able to reach all the nooks and crannies
once the gun's in place.
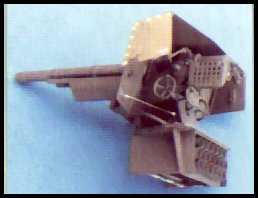
NOW FOR THE GUN
The main section of the gun mount: has a casting block which needs careful
sawing to remove, 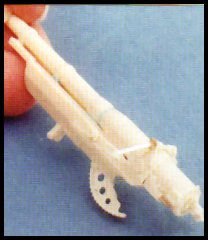 but
the front plate just needs to be scored along the joint and snapped off
its block. The top section is on a flat casting block, which needs
to be removed till all that's left is a U shape all on one level.
Use wet'n'dry paper with plenty of water and sand with a figure-of-eight
motion to keep the bottom flat - check often to make sure you're not taking
more off one side than the other, and turn the part round to finish sanding
if you are. Don't clean out the holes in the front plate, they're
not really holes filled with flash but locations for the ends of the ammo
stowage tubes. Take care removing those ammo tubes from
their
but
the front plate just needs to be scored along the joint and snapped off
its block. The top section is on a flat casting block, which needs
to be removed till all that's left is a U shape all on one level.
Use wet'n'dry paper with plenty of water and sand with a figure-of-eight
motion to keep the bottom flat - check often to make sure you're not taking
more off one side than the other, and turn the part round to finish sanding
if you are. Don't clean out the holes in the front plate, they're
not really holes filled with flash but locations for the ends of the ammo
stowage tubes. Take care removing those ammo tubes from
their  casting
blocks, it's easy to crush their fragile open ends as I found out.
Fortunately Kendall gives plenty of spares!
casting
blocks, it's easy to crush their fragile open ends as I found out.
Fortunately Kendall gives plenty of spares!
You'll have noticed that there's no marked location in the mount for
the front plate. This isn't a problem: superglue the short tubes
to the rear of the mount, add the long ones with their ends lined up with
the short ones, then position the front plate with the ends of the long
tubes in the "holes" and Bob's your uncle. Add the top plate and
the cross-pice which the actual gun fits onto, and paint the assembly.
Note how the tubes fit, with the tabs on thelong ones and the short ones
of the middle row pointing down and those of the bottom row pointing up
- mine are wrong as I misread the instructions, so don't copy my photograph.
The ammo tubes are empty, but if you want a fully stowed GMC it should
be simple to add shell ends
to the tubes.
Now for the gun cradle. Again, there's an awkward casting block
to remove; saw it away in sections and pare off the remaining stub with
your knife - there's no need for precision as the bottom of the carriage
will be hidden inside the gun mount.  You
may need to recut the slot in the back where the elevation arc goes through
the cradle; test fit to see when you've built the
You
may need to recut the slot in the back where the elevation arc goes through
the cradle; test fit to see when you've built the
gun slide. The traverse gearbox goes on top, hanging over the
front, and the traverse arc simply glues underneath it. Kendall doesn't
provide anything to hold it to the gun mount, but I've no information on
what should be there and it isn't really visible when the model is completed.
Dry-fit a straight length of wire through the slot on the port side and
check that it will go into the locating hole of the traverse gear - if
not, lengthen the slot until it does.
The gun tube is in two parts, so take care to line them up. Mine
didn't fit properly on the recoil slide, so I added slips of plastic card
under the barrel bands to lift the barrel and keep it in line, then a touch
of filler to blend them in. Kendal gives the breech in its open position,
with an alternative part if you want it closed - just file the back of
the block flat and fit the new part on it . Either way, three small parts
build the operating mechanism as in my photo.  Add
the triangular parts 41 to the top of the barrel, making sure that they
don't prevent its trunnions fitting into the cradle, then add part 37 between
them with the holes in
Add
the triangular parts 41 to the top of the barrel, making sure that they
don't prevent its trunnions fitting into the cradle, then add part 37 between
them with the holes in
its square blocks pointing to the rear. Fix the travel
lock part 32 under the slide, just in front of the raised section, and
the block part 38 to the side of the breech. Find a bit of wire to
make the connection from this block to the barrel, and some brass rod for
the handwheel shafts - the plastic rod which Kendall too thick and you'll
need it for the gun crutch anyway
Fix the shafts and handwheels, with etched part 12 under the shaft for
the large handwheel Although not shown in Kendalls's instructions, this
is a brace for the shaft. Kendall provides the standard indirect
gunsight in resin, but I didn't fit it as apparently only modified M3 GMCs
carried it. 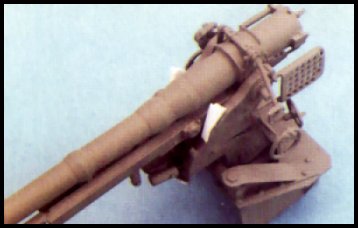 The
plastic rod provided does nicely for the sight mount on the port side.
Add etched part 13 to the port side of the triangle structure on top of
the barrel, then a 9mm length of rod pointing down at 45 degrees with the
un-numbered resin part on its end. This is the direct sight
mount - see my photos for the way it should look when built. Unfortunately
I couldn't find a photographs showing the indirect telescope sight so didn't
try to model it; add a plain length of plastic rod if you want to represent
it.
The
plastic rod provided does nicely for the sight mount on the port side.
Add etched part 13 to the port side of the triangle structure on top of
the barrel, then a 9mm length of rod pointing down at 45 degrees with the
un-numbered resin part on its end. This is the direct sight
mount - see my photos for the way it should look when built. Unfortunately
I couldn't find a photographs showing the indirect telescope sight so didn't
try to model it; add a plain length of plastic rod if you want to represent
it.
Kendall's plastic rod is also fine for the gun crutch which fit on the wall in front of the gun mount - Kendall shows its shape but for some reason doesn't give dimensions. I used two legs 17mm long, cemented together at the top and 10mm apart at base to fit the mounts on the body wall, then cut a crosspiece to fit a quarter of the way up from the base. The resin C-shape goes at the top, then it can be painted and fixed to its mounts.
THE GUN SHIELD
This is Kendall's master stroke. It comes in three main etched
brass parts to be bent and fixed together. The sides have recesses
onto which the roof fits, and all you have to do is adjust the roof's centre
bend until the sides of the central gun opening are parallel. Very
simple, and surprisingly strong. 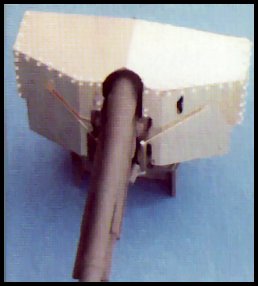 It's
even stronger when you've fixed the internal angle pieces in place - check,
though, that you fix etched parts 4 and 8 on the correct sides as their
bottoms are angled to fit the slope of the shield. Kendall doesn't
provide bolt heads on the outside of the shield - as they rightly say,
etching has its limits! Add these, in the locations etched on the
brass, from slices of plastic rod or whatever method you prefer. Photographs
show that there should also be bolt heads along the edge of the roof, paired
with the ones on the sides. Kendal doesn't mention these, but I hope
you can see from my photo how they fit. As an aside, Kendall refers
to bolt heads on the shield so I use that term here, but photos seem to
show rivets so don't worry too much about the facets which would show on
bolt heads.
It's
even stronger when you've fixed the internal angle pieces in place - check,
though, that you fix etched parts 4 and 8 on the correct sides as their
bottoms are angled to fit the slope of the shield. Kendall doesn't
provide bolt heads on the outside of the shield - as they rightly say,
etching has its limits! Add these, in the locations etched on the
brass, from slices of plastic rod or whatever method you prefer. Photographs
show that there should also be bolt heads along the edge of the roof, paired
with the ones on the sides. Kendal doesn't mention these, but I hope
you can see from my photo how they fit. As an aside, Kendall refers
to bolt heads on the shield so I use that term here, but photos seem to
show rivets so don't worry too much about the facets which would show on
bolt heads.
 Once the shield's
in place the gun is finished, but the problem is that Kendall hasn't given
any way of fixing the shield to the gun! What's missing is a shield
mount on each side of the carriage. Make these from 1/2mm plastic
card by cutting two rectangles 8mm by 3mm. Mark 3mm down one long
edge of each, and cut from here to the opposite corners to make triangles.
Add a
Once the shield's
in place the gun is finished, but the problem is that Kendall hasn't given
any way of fixing the shield to the gun! What's missing is a shield
mount on each side of the carriage. Make these from 1/2mm plastic
card by cutting two rectangles 8mm by 3mm. Mark 3mm down one long
edge of each, and cut from here to the opposite corners to make triangles.
Add a
strip of plastic card to the longest sides, which will be the fronts
of the mounts, and fix the two pieces to the carriage a little behind the
"bosses" on the sides of the gun slide. Superglue the shield to these
and add two bolt heads as seen in my photos. Cut lengths of brass
rod to make the shield braces as shown by Kendall - there should be two
each side of the
gun, one inside and one outside the shield.
FINISHING OFF
Paint the completed gun assembly and fix it to the floor - the boss
at its front should engage with the semi-circle mount on the body's front
wall. Now all that's left is the the tool stowage provided by Tamiya
(don't forget to add the missing central handles to the jerricans, so they
match those inside the body), Kendall's rear stowage boxes, and the
headlamps. Kendall provides a pair of super etched brass headlamp guards,
in four pieces each.  Bend
the strips 17 round a paintbrush handle to make semi-circles and fix the
grilles 16 inside them - not on the front edge but half the way back.
Bend the bases of the 18s to about 45 degrees and fix one to each side
of both guards, then fix them as shown in my photos, slanting back.
Bend
the strips 17 round a paintbrush handle to make semi-circles and fix the
grilles 16 inside them - not on the front edge but half the way back.
Bend the bases of the 18s to about 45 degrees and fix one to each side
of both guards, then fix them as shown in my photos, slanting back.
The only real disappointment of this conversion is that Kendall don't
supply the actual headlamps, so you'll have to either fit the inaccurate
Tamiya ones as I did or model your GMC with its headlamps removed - quite
legitimate, they were often removed before going into action because the
gun blast shattered their glass. 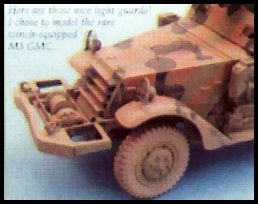 The
real M3 GMC had headlamps of the pattern shown on the box top photograph,
so if you've anything like these in your spares box, fit them.
The
real M3 GMC had headlamps of the pattern shown on the box top photograph,
so if you've anything like these in your spares box, fit them.
I painted my GMC in the US Marine three-colour scheme of faded olive
drab, earth red and black shown for a winch-equipped vehicle in one of
the plates in Steve Zaloga's US Tank Destroyers inCombat (Concord Armor
at War series, 1996, ISBN 962 361 609 0). Humbrol 155 and 186 provide
the faded olive and earth red, with of course 33 for the black, and the
black-on-white unit markings on the gunshield have to be painted by hand.
The Zaloga book includes some very useful photos and plates of M3 GMCs, and another good reference is M3 Half-Track In Action by Jin Mesko (Squadron/Signal Publications, 1996, ISBN 089747 363 9). This includes a clear photograph of the gun and mount which is very useful.
FINAL VERDICT
Kendall does deserve criticism for the missing headlamps, because you're
entitled to assume that what's shown on the box top is what's in the kit,
but otherwise this is a super kit which I recommend to anyone who feels
capable of tackling the cutting needed on the Tamiya floor.
Article published by Military Modelling Magazine Volume 28 Issue 1. Reproduced with permission from the Editor.
Back to ARTICLES Page