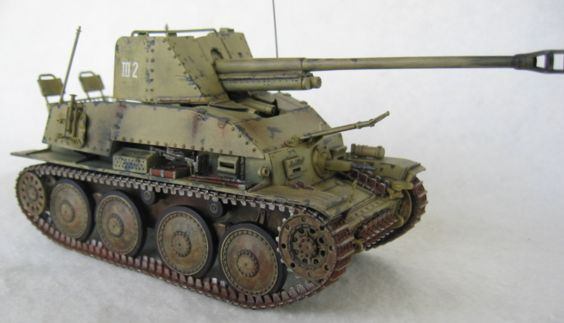
As a beginning modeler, I
browse the innumerable model galleries on the internet and marvel at the
quality of others' work - particularly the realistic weathering applied. I
aspire to such a high standard, yet know that those models are generally a
result of years of practice, hard work, patience, and considerable amounts
of trial and error. Such a realization can be daunting, as most beginners
can attest - we want results now! But I see modeling as a potential
life-long hobby, so I committed myself to diving in and trying things out.
As they say, "The journey of a thousand miles begins with a single step."
The biggest advantage a beginner has today is the internet. The amount of
information contained in newsgroups, web sites, and forums is voluminous
and easily accessible. Modelers seem to be a friendly, helpful bunch by
nature, and willingly share all sorts of hints and tips - knowledge that
previously would have had to been discovered on one's own.
The pitfall to having all this data is information overload. When a
beginner finds 10 different techniques to simulate chipped paint, and 5 of
them contain conflicting info, it can be overwhelming. This article will
chronicle my journey through my first model, in an attempt to guide other
beginners with "what worked for me." My subject was the Tamiya Marder III,
though the techniques aren't restricted to German WWII armor. The
techniques I describe here were chosen for the following reasons: they
provided the results I desired, without requiring huge amounts of time and
advanced skills or equipment. I certainly don't claim to have devised any
of these methods on my own. Instead, consider the following as a novice's
summary of worthwhile techniques.
Chipped Paint
My Marder was to represent a vehicle ravaged by the harsh elements of the
desert. The top coat of dunkelgelb should be worn through to expose the
underlying color - in this case, panzer grey. Rhodes Williams describes a
technique (http://rhodesawilliams.com/rhodestiger.htm) used on his
spectacular Tunisian Tiger, which I based my work on. His procedure has
more complexity to it (involving shading with an airbrush), so I
simplified it for my purposes since I had no airbrush.
Step 1: Apply the base color over the entire model. I brushed on Tamiya
German Grey. Let this dry well, or the next two steps will be messy. I
waited at least 24 hours before proceeding.
Step 2: Apply a masking agent wherever you want to depict chipping. I used
Grumbacher Miskit (purchased at my local Michael's store), applied with a
Microbrush (a plastic brush with nylon bristles - comes in a pack of 10
for about US$2.00). Before starting, I hacked up the brush so the bristles
were a variety of lengths. This helps with the randomness when applying
the Miskit. I used a stippling motion when applying rather than a brushing
motion, because it left a rougher edge, more closely resembling the way
paint chips away. The Miskit dries within a few minutes, and you can move
on to the next step quickly. Warning! Apparently Miskit dries very hard
after 24 hours or so, so be sure to perform steps 2-4 within 24 hours!
Step 3: Paint the top coat (I used Tamiya Dark Yellow from a spray can).
Two to three thin coats gave me nice coverage, and dried in a short amount
of time.
Step 4: Remove the Miskit. Pull on a latex surgical glove and rub the
areas where you applied the Miskit. Hopefully you remembered all the
spots, but if not, you should be able to see its rough surface through
your topcoat. The Miskit should peel up with little effort, taking the
topcoat with it, and exposing the base coat. On my Marder, this step took
about 30 minutes for the entire hull assembly.
 
Washes
The purpose of a wash is two-fold: to accent details, and to simulate the
accumulation of dirt and grime. This step was probably my most stressful,
as I read numerous horror stories about people ruining their beautiful
paint jobs with a misapplied wash. I read wash techniques utilizing all
different types of paints: acrylics, oils, and enamels, and finally chose
an enamel-based wash because that's what the instruction sheet
recommended. Tamiya wouldn't steer me wrong, would they?
One word of warning, which I can only speculate on: let the paint from
previous steps dry thoroughly before starting the wash. Due to a busy
schedule, I had a 2-week period where I didn't get much modeling done, so
the Marder's paint job had a chance to cure well. I can't say for certain
if this break benefited me, but I have read several recommendations by
others to allow such a curing time when applying enamels over acrylics.
(But then again, the dark yellow Tamiya is actually a lacquer, so who
knows? This is one of those cases where I found lots of conflicting
information.)
For paint, I chose two or three dirty-colored ModelMaster enamels (Burnt
Sienna, Rust, and Raw Umber), and a bottle of MM thinner. In a small
mixing cup, I mixed roughly a 3:1 ratio of thinner to paint. As I read
somewhere, it should be closer to "dirty thinner" than to "thinned paint."
Load up a very fine (I used a #000) brush with the wash, and touch it to
an area of your model you wish to "wash." Such areas include panel lines,
rivets, raised areas, and any nooks and crannies likely to collect dirt.
You generally don't need to "paint" the wash on; capillary action should
draw the paint off the brush and flow around the model's details. After a
little practice, you'll begin to get a feel for how much wash to load on
to the brush for the area you're working on. A rivet demands much less
than a panel line, for instance.
Don't apply too much all at once; it's better to apply a couple of
thinner, lighter coats. If you find you've applied too much in an area,
use a bit of thinner on a rag, Q-Tip, or Microbrush to remove the excess.
I completed the washing over a couple of evenings' work, and ultimately
found it much easier than I had been led to believe. The results can
certainly be dramatic!
 
Rust
I didn't portray any significant rusty streaks or rusty chips on my Marder,
so I'll limit my comments to depicting a rusty muffler. Using a Microbrush,
I applied a liberal amount of plastic cement (in my case, Tenax 7R) to the
muffler until the plastic softened slightly, then stippled the surface to
give it a rough texture. If it gets too rough - as it did for me - wait a
few minutes for things to dry and use a fine sanding stick to knock down
some of the bigger "roughies." Apply a coat of a rust-colored paint (I
used ModelMaster "Rust"). The rough texture should still be visible, even
after painting. Once the paint is dry, I applied a liberal amount of
pastel chalks, using a Microbrush. I used black, a couple of shades of
brown, and a red-orange. Brush some chalk on, then blow any loose chalk
off. Repeat this until you achieve the results you desire.
Tracks
Using the same rust-colored paint that I used for the muffler, I
completely covered the tracks. After it was dry, I applied a heavy wash of
raw umber. This wash had more paint than the mixture I described above,
and I applied it using a larger brush. Since tracks are pretty dirty, I
slathered the wash on quite heavily.
Take a good look at the next bulldozer you see, and you'll note that the
high points of the tracks are shiny metal because of the continual wear.
No dirt collects where the metal meets the road! To accomplish this look,
a technique called dry-brushing is used. I armed myself with the
following: a flat, wide brush; ModelMaster "Steel" paint; and a piece of
paper towel. Get some paint on the brush, then brush most of it off on the
paper towel. When only a trace remains, brush it across the tracks. What
little paint remains on the brush will collect on the raised details. The
goal is to slowly build up this metallic sheen, so it will likely take
several repetitions to achieve the look you desire. A final dusting of
pastel chalks gives the tracks that well-worn, dusty appearance (see next
step for more detail on chalking).
Chalking
The final step in my weathering journey was an application of pastel
chalks. I am fortunate to have a "crafty" wife who had a large palette of
such chalks, including numerous earth tones. My purpose in using the
chalks was to provide some variation in color, and to portray another
layer of dust on the vehicle. Because I don't have an airbrush, I was
somewhat limited during the painting process in the types of
shading/lightening I could do. I've read many articles instructing to
"shoot a fine layer of Tamiya Buff over the entire model" with an airbrush
to provide a faded or dusty look to the model. Well, that's pretty hard to
do with a paintbrush, so I attempted to use pastels to simulate the
effect.
I applied the chalk in two different ways. If I needed a very small
amount, I would simply take a paintbrush and rub it across the chalk to
collect a bit on my brush. If more chalk was needed, I would scrape some
out of the container using a hobby knife into a small pile. Doing this
also enabled me to mix colors to achieve the tone I liked. I applied the
chalk to heavily worn areas, and anyplace likely to collect dirt. With a
mix of lighter chalks, I brushed over the areas that would be exposed to
the sun, to simulate faded paint.
Conclusion
So many modelling articles assume some prior level of knowledge that they
can be difficult for beginners to follow. Writing as a novice myself, I
hope to have removed such barriers while summarizing a variety of methods
that worked for me. I hope that other beginners will be inspired to try
any or all of the methods on their next kit.
|


