
Tamiya 1/16 Machine Gunner Great Coat

|
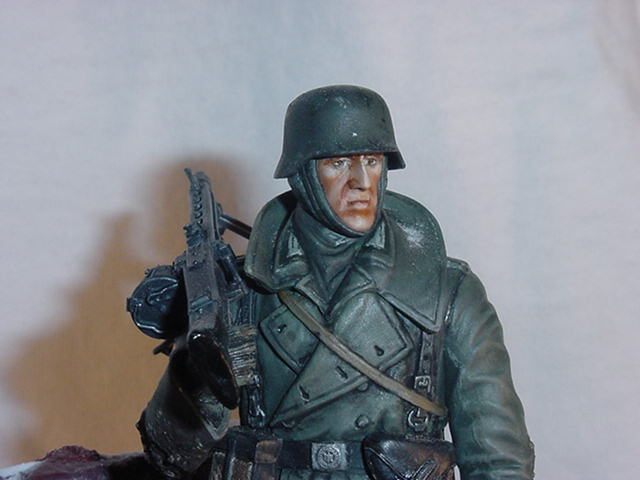
This figure is probably one of the best within the collection of Tamiya’s figures. I could say easily that Tamiya have found a way to produce an excellent quality of figures in plastic. The details found on those figures are quite remarkable compare to a similar figure in resin. If you never built a figure in 1/16 scale and you don’t want to spent a lot of money on your first one, well, this is the one to consider. The machine gunner with great coat was a common figure during the winter especially during the time that Germany was trying to conquer the Soviet Union. At the beginning of the soviet campaign, the German were not concern about the weather. But as soon as the winter started to settle down, they realised that it wouldn’t be easy to survive in such extreme condition. The Russian knew it but the Germans had to learn it the hard way. They had to come up with some new equipment to protect the soldier from dying under these conditions. The great coat was very appreciated among the Germans soldiers. The first coat were made of wool but for economical reasons, they switched progressively to rayon. The MG42 was also a great gun and very popular among the Germans. The firepower was extremely impressive. It was firing around 1200 rounds/minutes. Based on the MG34, this gun was supposed to be less expensive to build and more effective. Due to dirt and damages easily done during fight on the field, they had to come up with a new gun capable of enduring the most extreme conditions. Even though the life expectancy of the barrel was less than the MG34, it was so easy to change that the Germans wouldn’t mind it. It could fire a belt full of 7.92mm bullet, standard bullet of the German army. Inside the box, there is only two sets of sprue containing all the parts. On the first one, all the major component to build the figure itself, arms, legs, coat, head, etc… The other one contains the extras, such as gun, helmets canteen, grenade, etc… The glue is the standard liquid glue for plastic. No need for a 2 parts epoxy or superglue. This is like a tank or a standard plastic kit. Plus there is no flash to clean, and everything is aligned perfectly. I must say that the assemble took me about one evening to complete. I kept the head and arm on the side to ease the painting process, but if you feel more comfortable to assemble the entire figure, well, go ahead and do it. No problem there. There is maybe a little bit of filling here and there but nothing seriously embarrassing. The coat is a piece of art itself. It has 3 parts, one that goes in the back and 2 more in the front. This system allowed the coat to have a natural look instead of having only one piece that look unnatural. Plus, underneath this assemble, all the details are included even if we are going to cover it. The collar is a beauty; it look like its floating. Once the head is one the figure, everything look just great. Once everything is in place, I drilled 2 holes, one underneath each foot to insert 2 rod and glue the figure on a painting base. Then I will spray a thin coat of primer, using acrylic paint, field grey to cover the whole figure. I used also some tan colour to spray the face because the green colour is too dark to be used as a primer colour. All my figures are painted with oils. This medium allow me to paint nice shade of colour, highlights and shadows. The transition is always smooth. I don’t feel quite comfortable to use acrylics cause the paint has the tendency to dry too quickly. Plus, I can mix my own colour, something that I like better than having to choose between prepared colour. This way, there is no chance that this kind of field grey will be the same as another one. The fact that I don’t know if the mix would be the exact match of the real coat, doesn’t matter. After all, dirt, mud and the extreme conditions that those soldiers were facing, is a good indication that my personal mix of field grey would be almost right on the spot. So after mixing my first colour, using blue, yellow, a bit of red and black plus white, I will add more black to make the shadow colour and more white for the highlight. I always start with the shadow, going in all the crevasses and places where the light will not naturally hit the figure. To help , I place my figure underneath a strong light and this way I can see easily where all the shadows will go. Then , I apply the colour, using some lighter fluid as a thinner instead of turpentine. The lighter fluid dry more quickly and will offer a better matt base effect. Then I will do the same with the highlight and after that, I will start to blend the colours. This is done by a dabbing motion with a small brush large enough to cover the line between the colours. This way you won’t end up with a general colour, losing all your contrast. One thing about laying your colour: you need to spread the paint on the figure not to thin the paint. That mean that you will have just enough paint on the figure to cover the base colour. This method ensure also that the thickness of the paint stay reasonably small. You don’t want to end up an extra inch on your figure! After the first blend, I will put my brush aside and take a good look at my work. Using a mirror, I will try to find problems. Is the paint to thick? is the colour right for the amount of light? Is the blending to large or wide that I lost all the contrast? Is there a place where there is no paint? If everything look fine, I will continued with a second round of shadows and highlights to make sure that there is a strong contrast where it is very significant. During this process, I do only small areas at a time. One night, I will work on the left leg, then switch to the right on the second night. I work generally from the leg up to the face. When all the figure is covered, I will begin to paint the detail, like the straps and the buckle, buttons, insignia, etc… I will use a Prismacolor Silver pencil to paint the metallic buckle on the strap. I feel more control than using paintbrushes. For the face, I use a lots of techniques learned in my different references books, like Building and painting scale figures by Shep Payne. The eyes are paint with oils. I feel comfortable using oils cause I take a lot of time to paint these little things. I don’t care spending the entire night just to place and paint correctly the eyes. Then I will lay my shadows and highlights just like I did on the rest of the figure. I try to go slow just to make sure that the brush stroke doesn’t show. I will use some visor to help me see the result. I can only say that it take a lot of time to make sure that it look like a real human being. When I’m satisfied with the result, I will continued with the rest; canteen, grenade, machine gun. For the machine gun, I used a technique that I learned in an article of the magazine Fine Scale Modeler. The gun metal colour start with a quick spray of matt black. Then, using some oils, white with and a bit of gold ochre, I will take a small amount of the mixture and rub it on a scott towel to keep only a small amount allowing me to do a nice drybrush effect. I will use some metallic powder from SnJ to give a metallic look. Then I will use clear blue, with a small amount of thinner and spray a final layer giving the colour that gun metal effect. The Machine gunner is placed near a small ruin. It is late November 1943, and snow is covering the ground during the night but the day will melt it a little so everything is muddy. To make that mud I will use Liquitex, which is an extra high viscosity acrylic modeling paste, found in an art supply store. I will spread it to cover the entire base. The ruin walls were made with drywall putty. I use a scribing tool to carve the bricks. The wall is embedded in it with all the rubbles. The rubbles are just pieces of junk used to make the wall. I will also use some strip of balsa. When everything is in place, I let dry the modeling paste overnight. The next day, I will paint the wall with a brick colour and then using different shade of dark brown and black, I will paint the mud. Then I will cover the ground with Future to make a wet look. I will put some Future on the wall to simulate ice. Then I use baking soda to simulate the snow. Using the modeling paste, I will add some on the figure, elbows, on the bottom of the coat and in front, to make sure that it look like this machine gunner was lying on the ground at some point. This figure took me about 3 months to build and paint. It was a pleasure to do it. The details are very good and very impressive. I had so much fun that I bought all the 1/16 figures from this collection, the ace pilot, the tanker, Rommel, the elite infantryman and the infantryman with reversible uniform. I just hope that Mr. Tamiya won’t stop producing such magnificent models. |